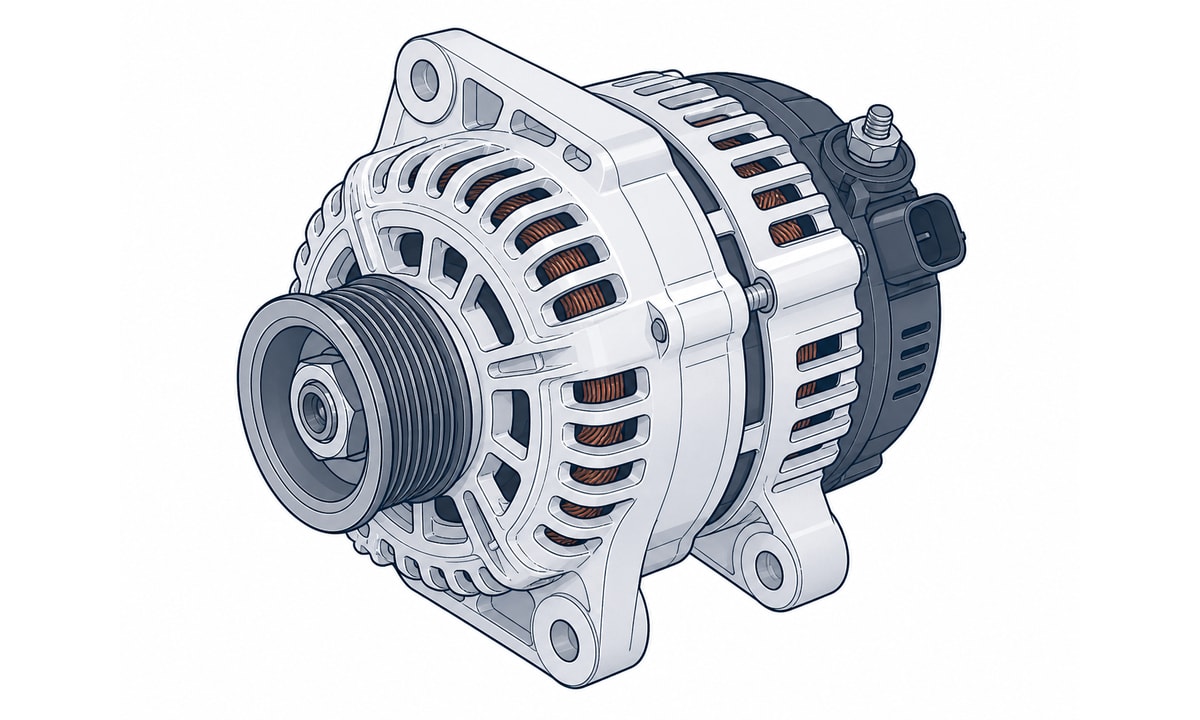
This is a general guide for passenger vehicle alternator replacement. It is not vehicle-specific and does not replace the vehicle manufacturer's service manual.
1. Product Overview
An alternator is part of the vehicle charging system. While the engine is running, the belt-driven alternator helps supply electrical power to the vehicle and helps maintain battery charge. The alternator works together with the battery, drive belt, tensioner, wiring, fuses, grounds, and vehicle control circuits.
This handbook provides general installation, safety, troubleshooting, and care information for passenger vehicle replacement alternators. Exact alternator location, belt routing, wiring layout, mounting hardware, access path, and charging-control design may vary by vehicle.
Always refer to the vehicle service manual for vehicle-specific instructions before installation.
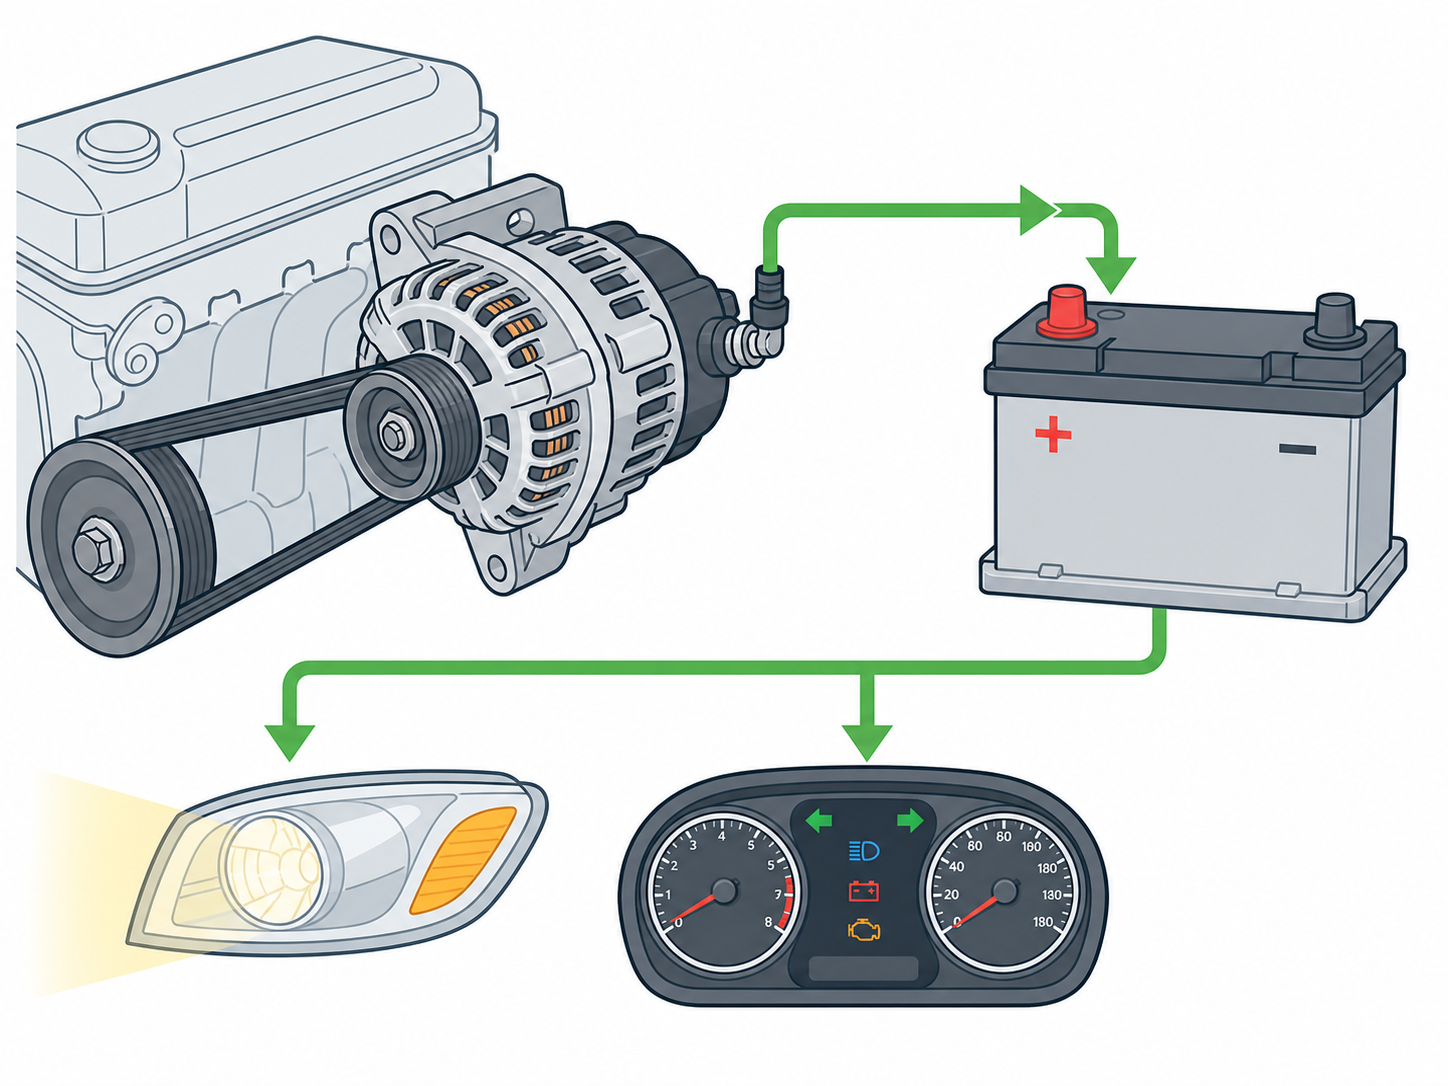
What This Guide Covers
- General alternator function
- Safety precautions before installation
- Basic checks before removing the old alternator
- General removal and installation steps
- Belt, pulley, connector, and wiring awareness
- Basic troubleshooting after installation
- Use, maintenance, storage, and support guidance
What This Guide Does Not Cover
- Vehicle-specific access paths or belt routing diagrams
- OE number, SKU, Lester number, or application matching
- Specific torque values unless provided by the vehicle service manual
- Specific charging voltage, amperage, or diagnostic thresholds
- Internal alternator repair, regulator repair, diode testing, or bearing service
- High-risk electrical testing or bypass procedures
2. Safety Instructions
Read all safety instructions before beginning work. An alternator is connected to the vehicle electrical system and belt drive system. Incorrect handling can cause short circuits, damaged components, belt or pulley injury, burns, or personal injury.
Before You Begin
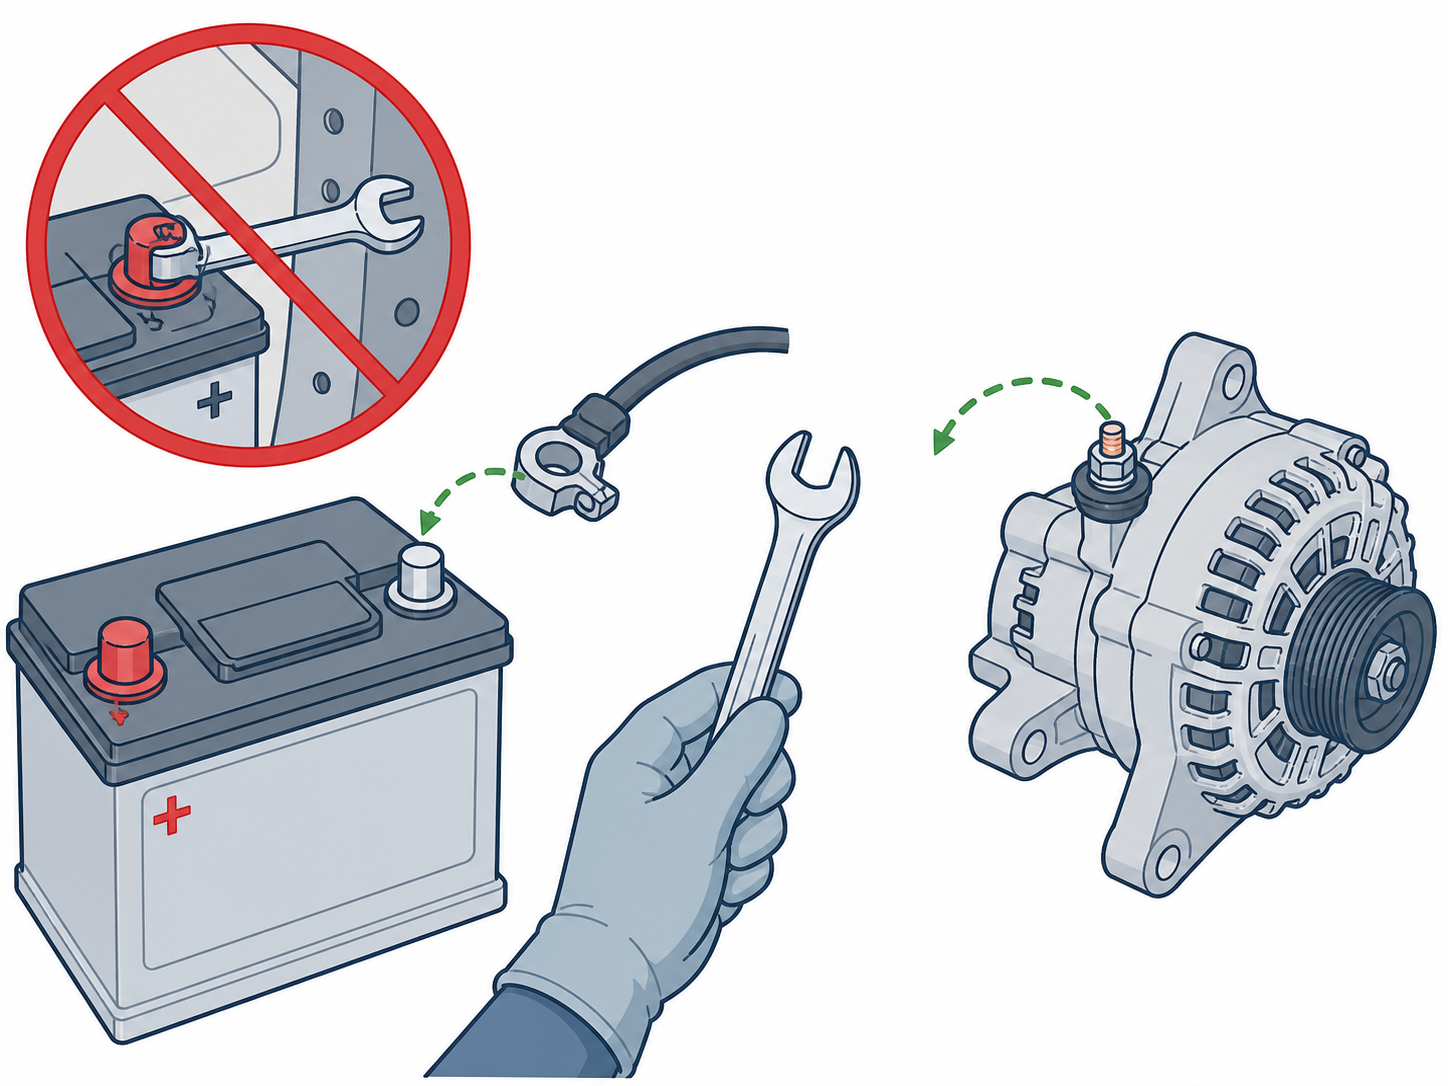
- Disconnect the negative battery cable before servicing alternator wiring.
- Allow the engine, exhaust components, and surrounding parts to cool before working.
- Keep hands, gloves, clothing, hair, and tools away from belts and pulleys.
- Use the correct hand tools or socket tools for fasteners and belt tensioner access.
- Keep metal tools away from direct contact between battery terminals, the alternator output terminal, and vehicle body metal.
- Wear gloves and eye protection when working around the battery, wiring, belt area, or under the vehicle.
- If the vehicle must be raised, support it securely with jack stands on a firm, level surface.
- Do not work under a vehicle supported only by a jack.
- If you are not confident with electrical, belt-drive, or under-vehicle work, have the alternator installed by a qualified technician.
Electrical and Belt Safety
Disconnect the battery before touching alternator wiring. Do not allow the removed battery cable to contact the battery terminal while you work. Keep wiring away from moving parts, sharp edges, and hot engine components.
Do not short the alternator output terminal to ground. Do not bypass relays, fuses, control circuits, or safety systems as a shortcut. This handbook does not provide short-circuit testing instructions.
Never place fingers or tools near a moving belt or pulley. Belt routing, tensioner design, and pulley arrangement vary by vehicle, so follow the vehicle service manual for the correct belt release and installation procedure.
3. Before Installation
Before removing the old alternator, perform a basic product and vehicle check. These checks help prevent misdiagnosis, repeated installation attempts, belt problems, charging-system issues, and unnecessary returns.
Check the New Alternator
- Inspect the packaging for visible shipping damage.
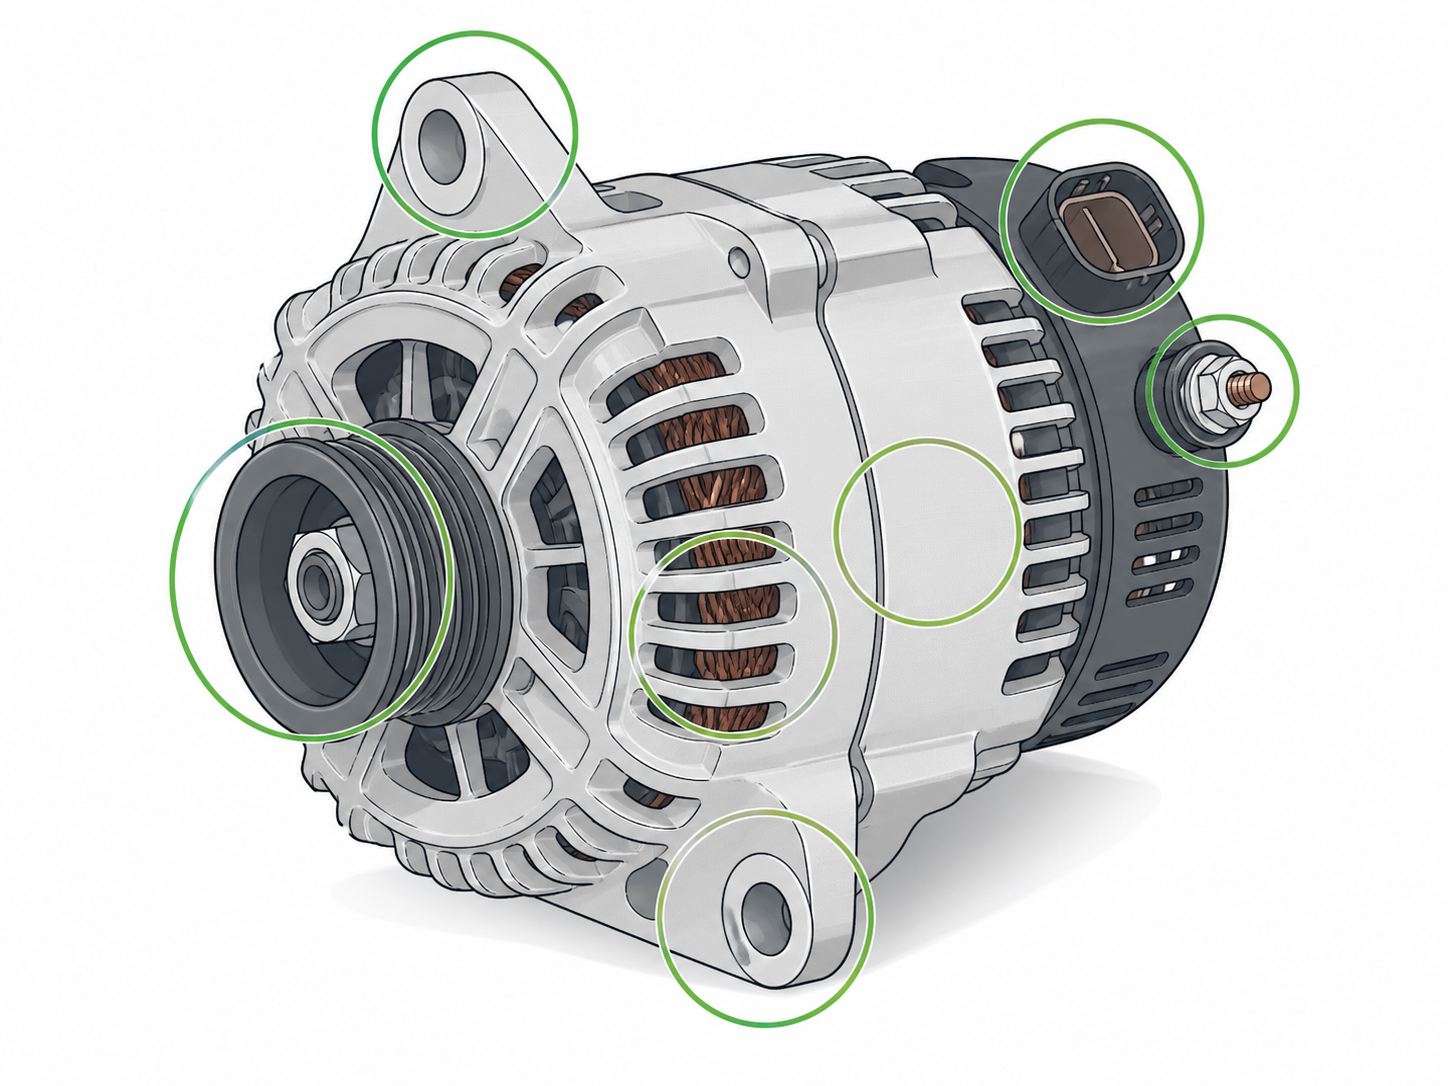
- Inspect the alternator housing, pulley, cooling vents, terminals, connector, mounting ears, and rear cover for visible damage or deformation.
- Make sure the pulley area is not bent, cracked, loose, or blocked by packaging debris.
- Do not install an alternator with cracked housing, bent terminals, damaged mounting ears, damaged connector, damaged pulley, or obvious shipping damage.
At this stage, do not try to fully compare the new alternator with the old alternator. The old alternator has not been removed yet. A full side-by-side comparison should be done after the old alternator is removed and before the new one is installed.
Check the Vehicle First
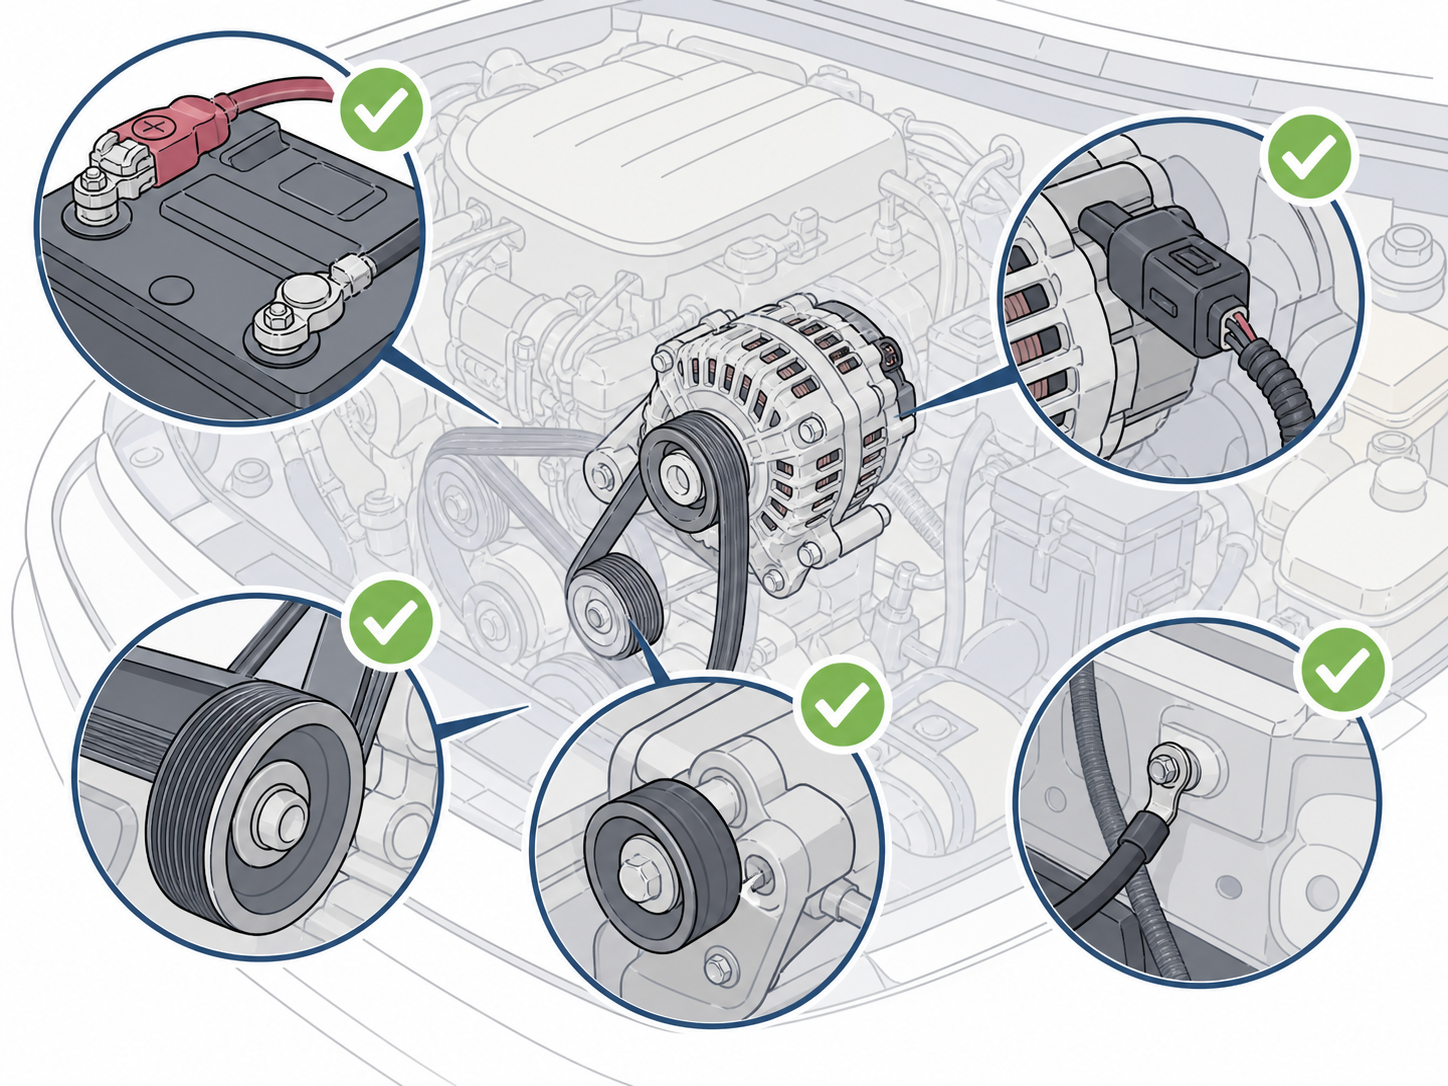
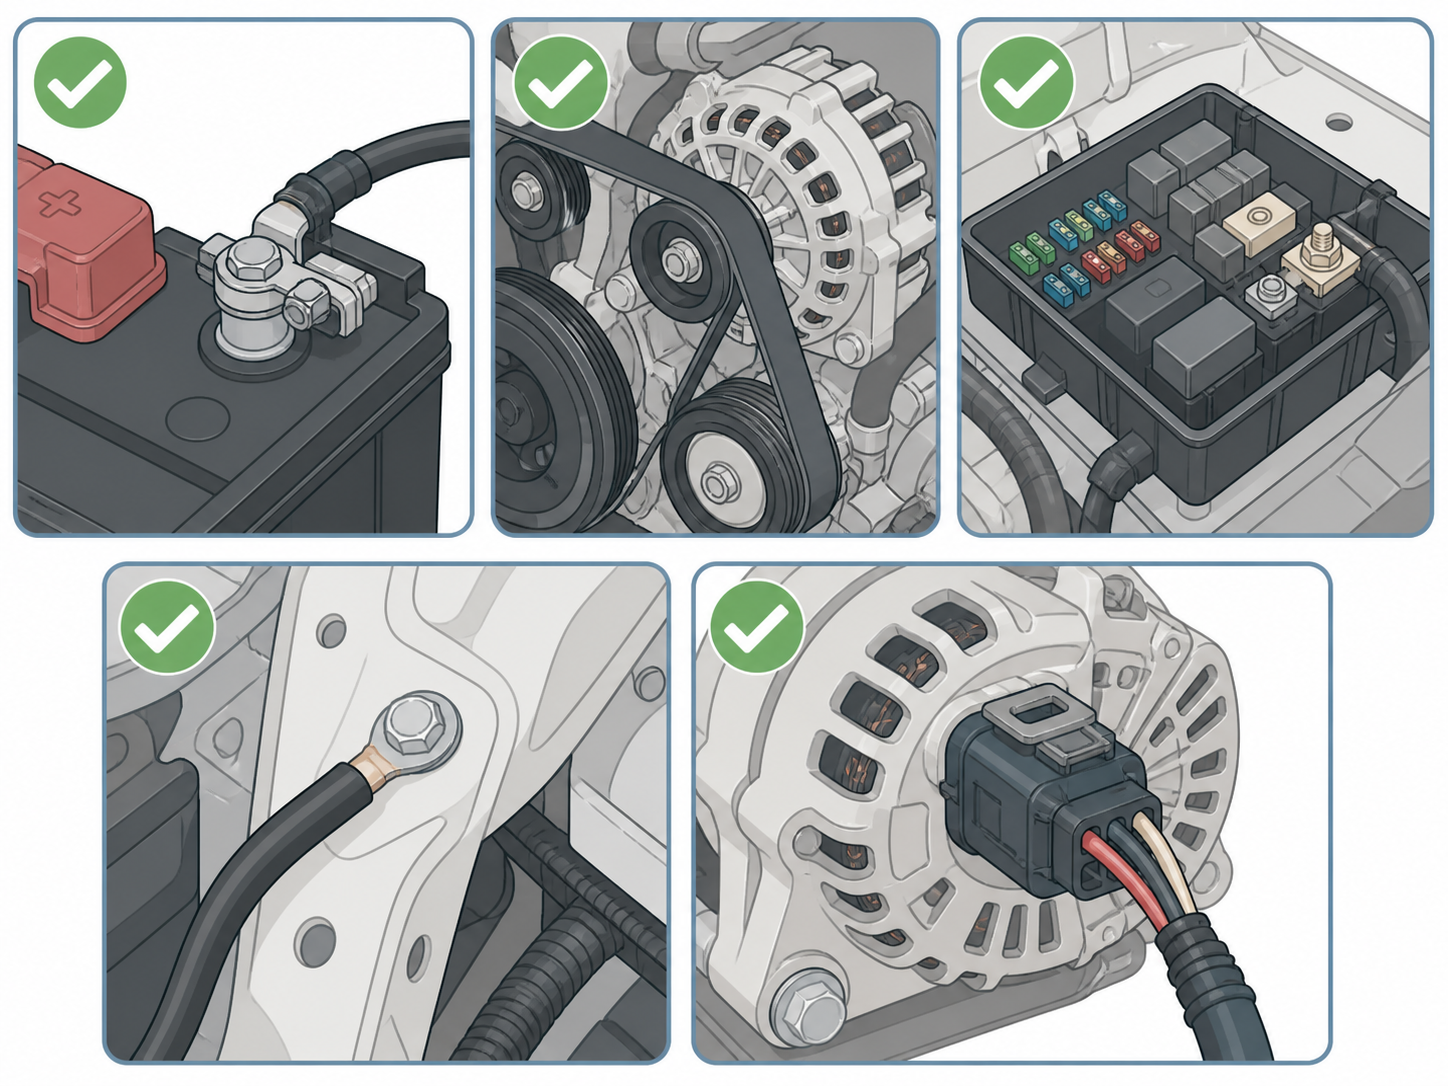
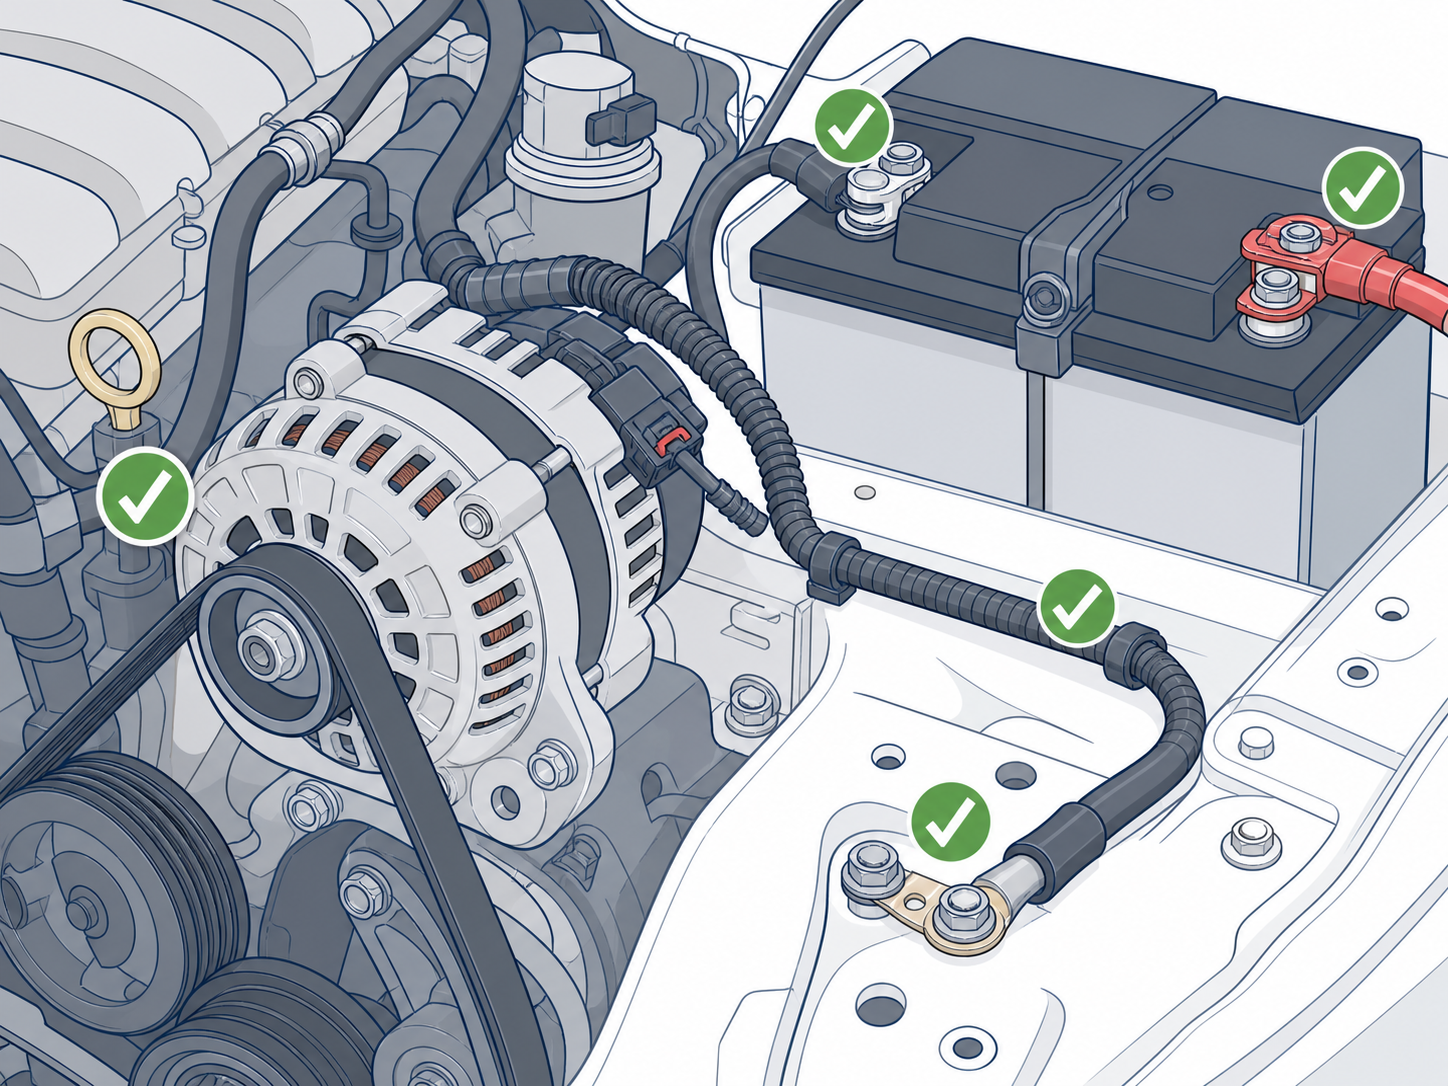
Before assuming the alternator is defective, check common charging-system issues:
- Battery charge condition
- Loose or corroded battery terminals
- Damaged or loose battery cables
- Ground cable condition
- Drive belt condition
- Belt tensioner and pulley condition
- Alternator fuse, fusible link, relay, or charging circuit condition
- Alternator connector and wiring condition
- Obvious wiring damage near the alternator or belt area
If the battery is weak, the belt is slipping, a fuse is open, or the wiring connection is poor, the vehicle may still show charging problems even with a good alternator.
Prepare for Installation
- Park the vehicle on a firm, level surface.
- Set the parking brake.
- Allow the engine to cool.
- Gather the correct tools.
- Take photos before disconnecting wiring or removing the belt.
- Keep removed fasteners organized.
- Refer to the vehicle service manual for access instructions, belt routing, belt tensioner procedure, and fastener specifications.
4. Removing the Old Alternator
The following steps describe a general alternator removal process. Actual access, belt layout, and wiring layout may vary by vehicle.
Step 1 - Disconnect the Battery
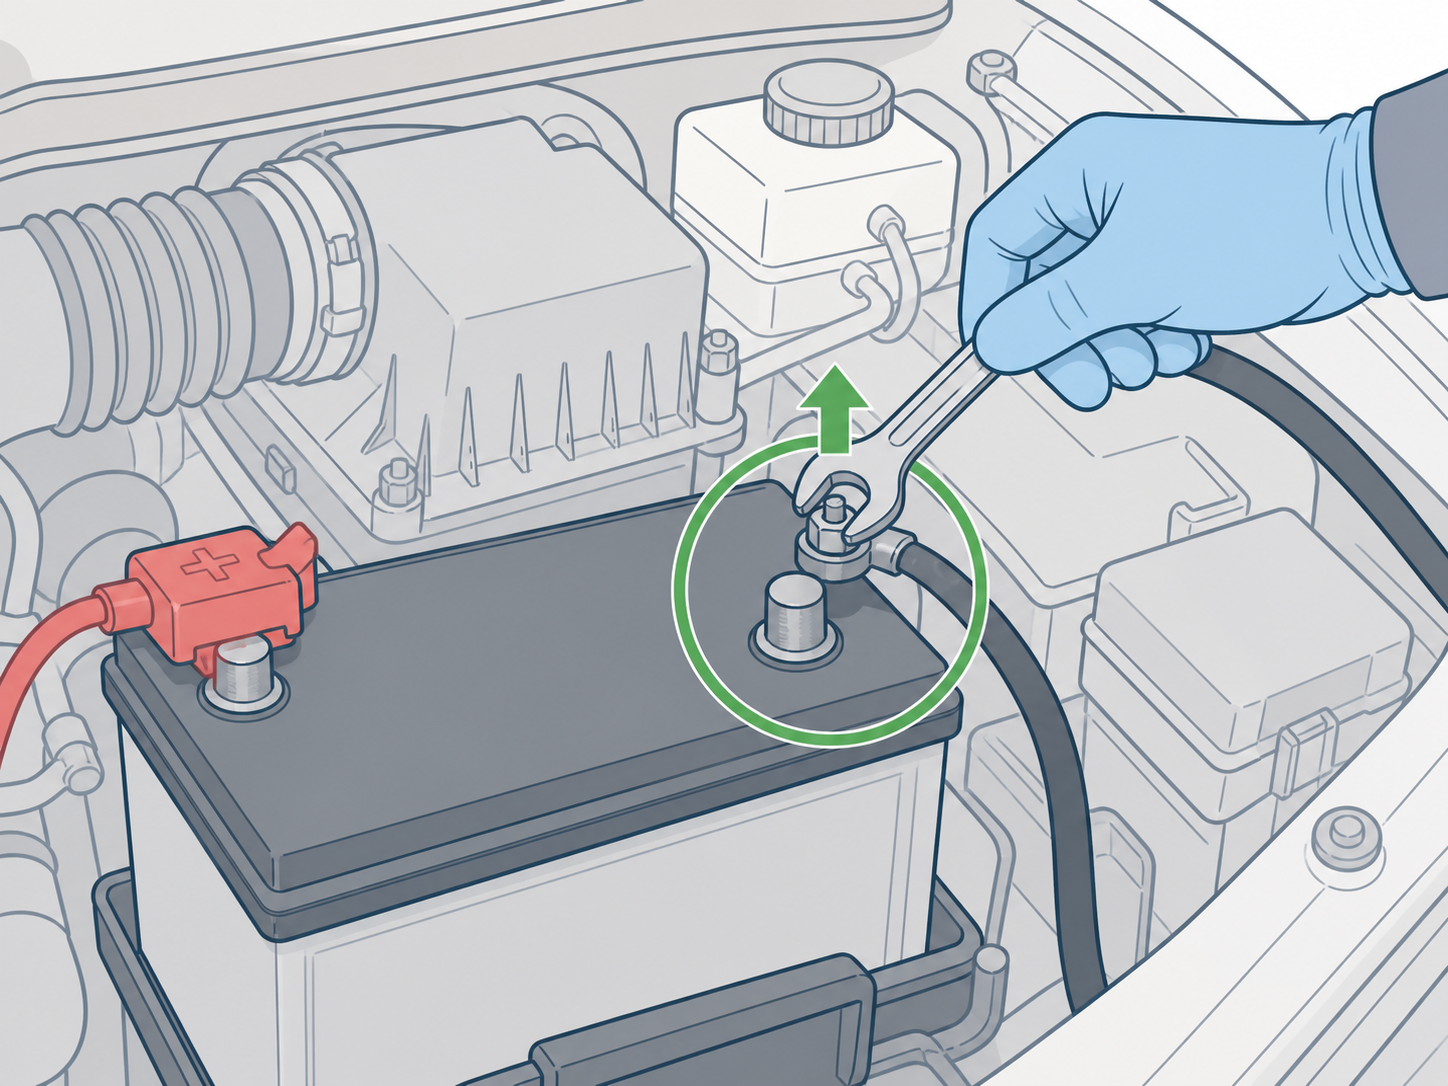
Disconnect the negative battery cable before servicing the alternator. Loosen the nut that secures the cable to the negative terminal. You usually do not need to remove the nut completely. Once the cable is loose, lift it from the terminal and tuck it aside so it cannot touch the terminal while you work.
Do not remove the positive cable unless the vehicle service manual specifically requires it.
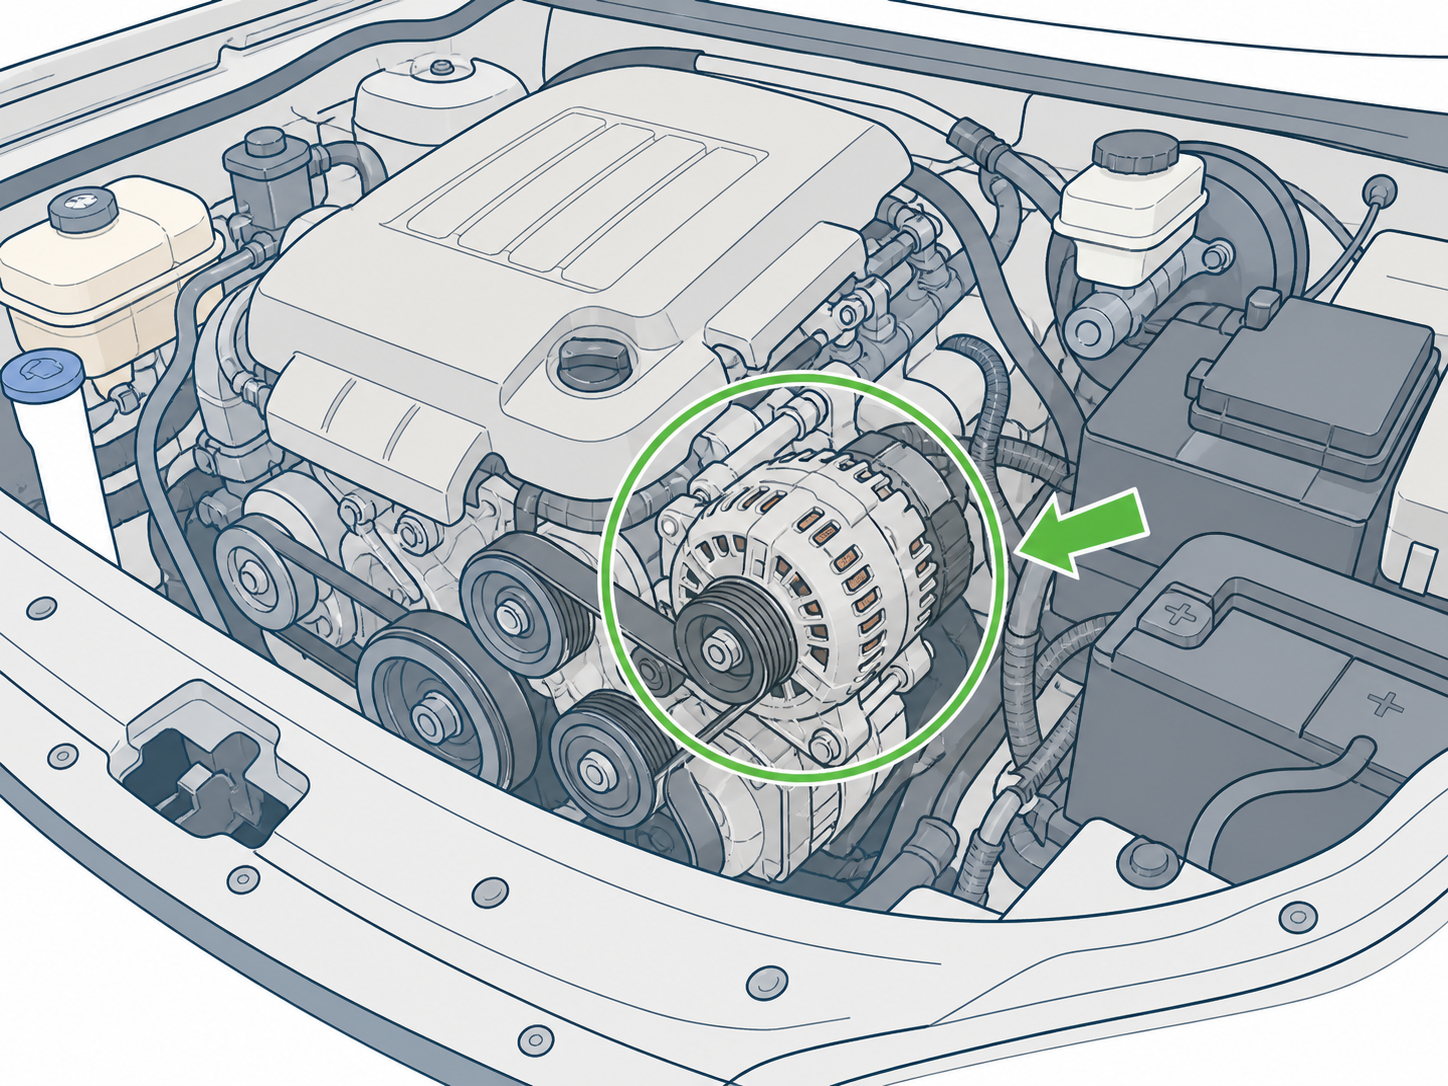
Step 2 - Locate the Alternator
The alternator is usually mounted on the front or side of the engine and is driven by a belt. It typically has a pulley on the front, a metal housing with cooling openings, and one or more electrical connections on the rear or side.
If you cannot locate the alternator or access path, refer to the vehicle service manual.
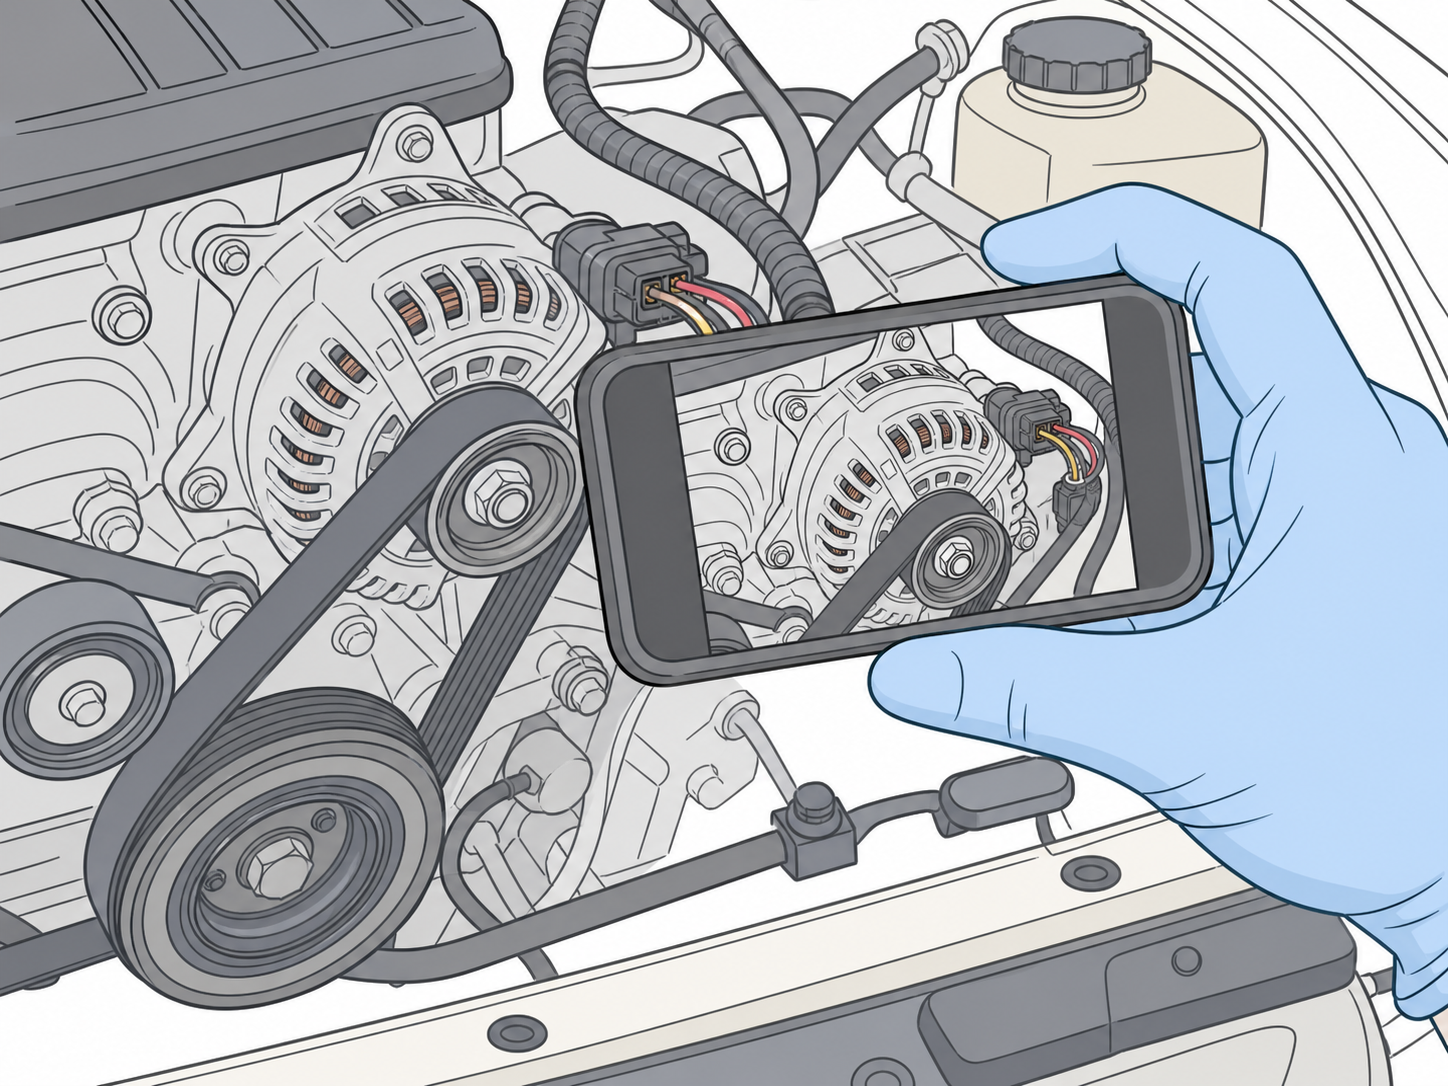
Step 3 - Photograph the Wiring and Belt Area
Before removing any wires or belt components, take clear photos of the original wiring layout and the belt routing area. This helps ensure the wires are reconnected correctly and helps you verify the belt path during installation.
Do not rely only on memory for belt routing. If the belt routing label is missing or unclear, refer to the vehicle service manual.
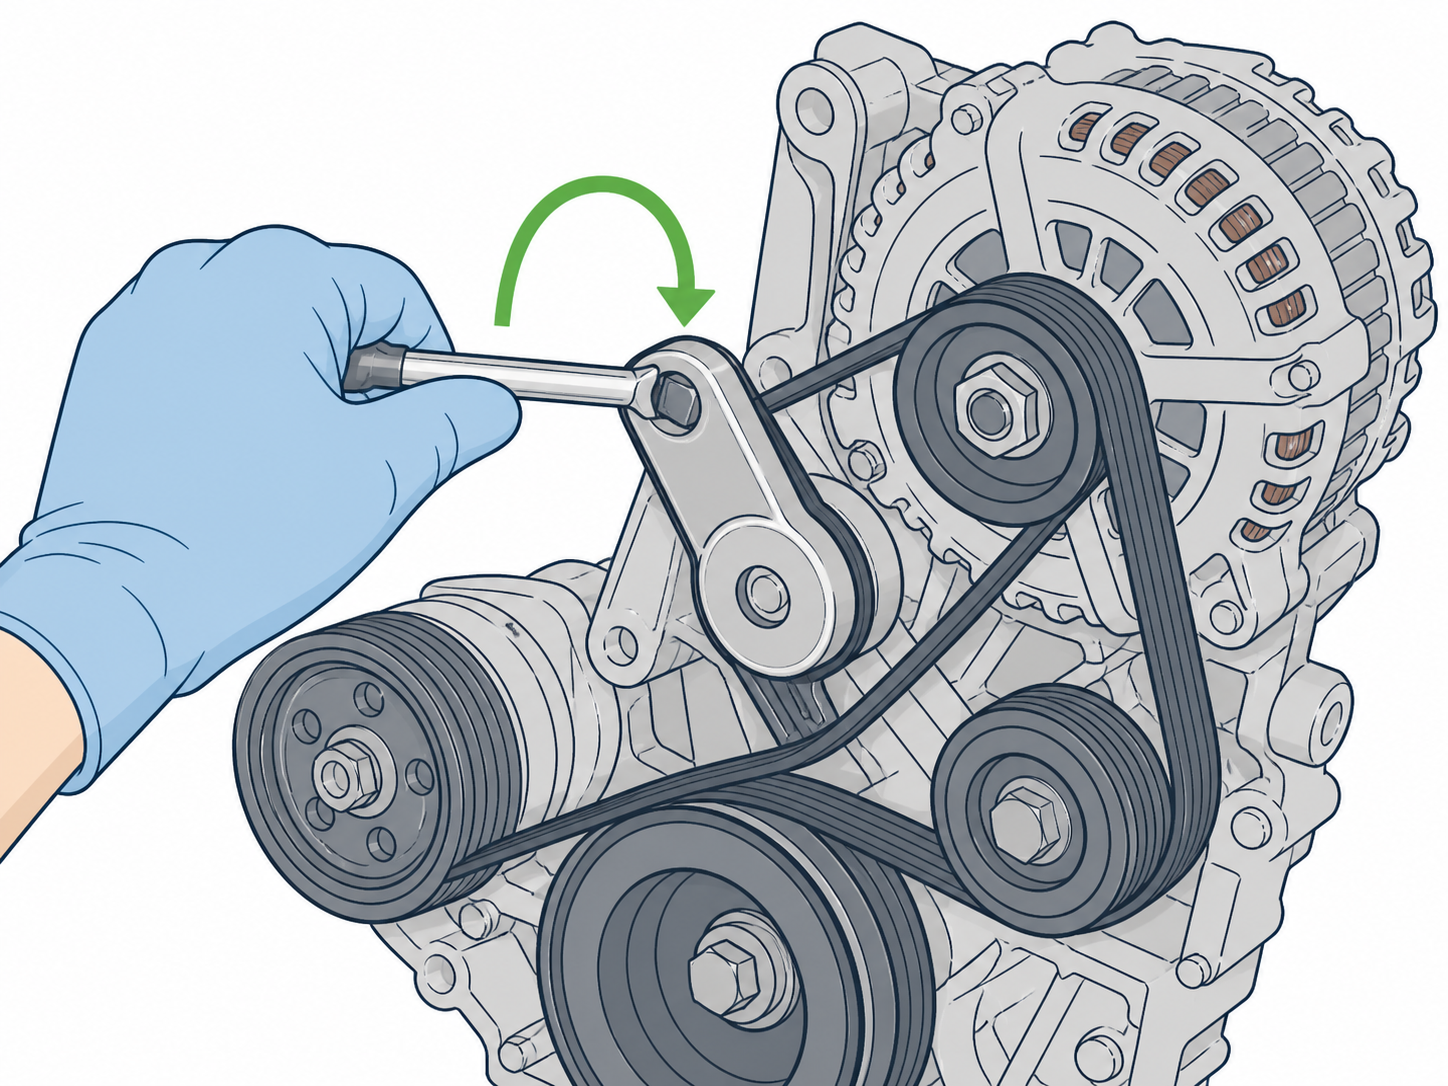
Step 4 - Release Belt Tension
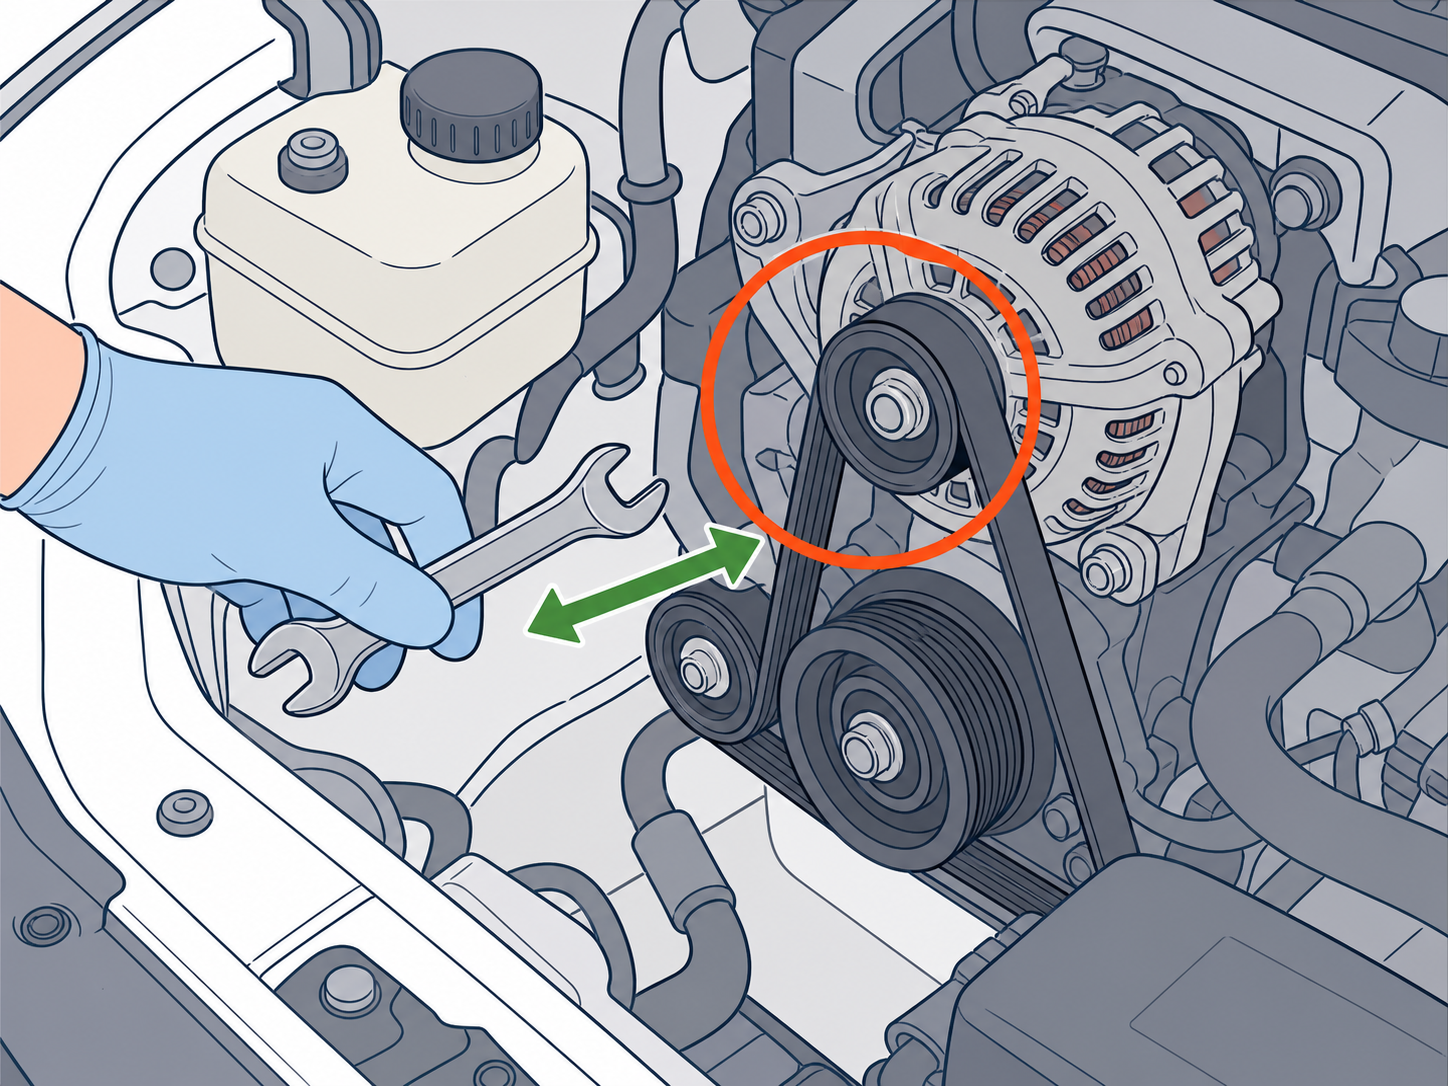
Release belt tension according to the vehicle service manual. Some vehicles use an automatic tensioner. Others may use an adjustable alternator bracket or a different belt-drive layout.
For automatic tensioner systems, use the correct tensioner tool and slowly move the tensioner only far enough to remove the belt from the alternator pulley. For adjustable-bracket systems, the alternator pivot bolt and adjustment bolt may need to be loosened before the belt can be removed. Follow the vehicle service manual for the correct method.
Use the correct tool and keep your hands clear of pinch points. Do not pry against delicate pulleys, wiring, plastic covers, or aluminum mounting areas unless the vehicle service manual provides a specific procedure.
Once the belt is off the alternator pulley, inspect the belt and nearby pulleys for cracks, glazing, fraying, contamination, rough movement, wobble, or obvious damage. Replace worn belt-drive components according to the vehicle service manual before installing the new alternator.
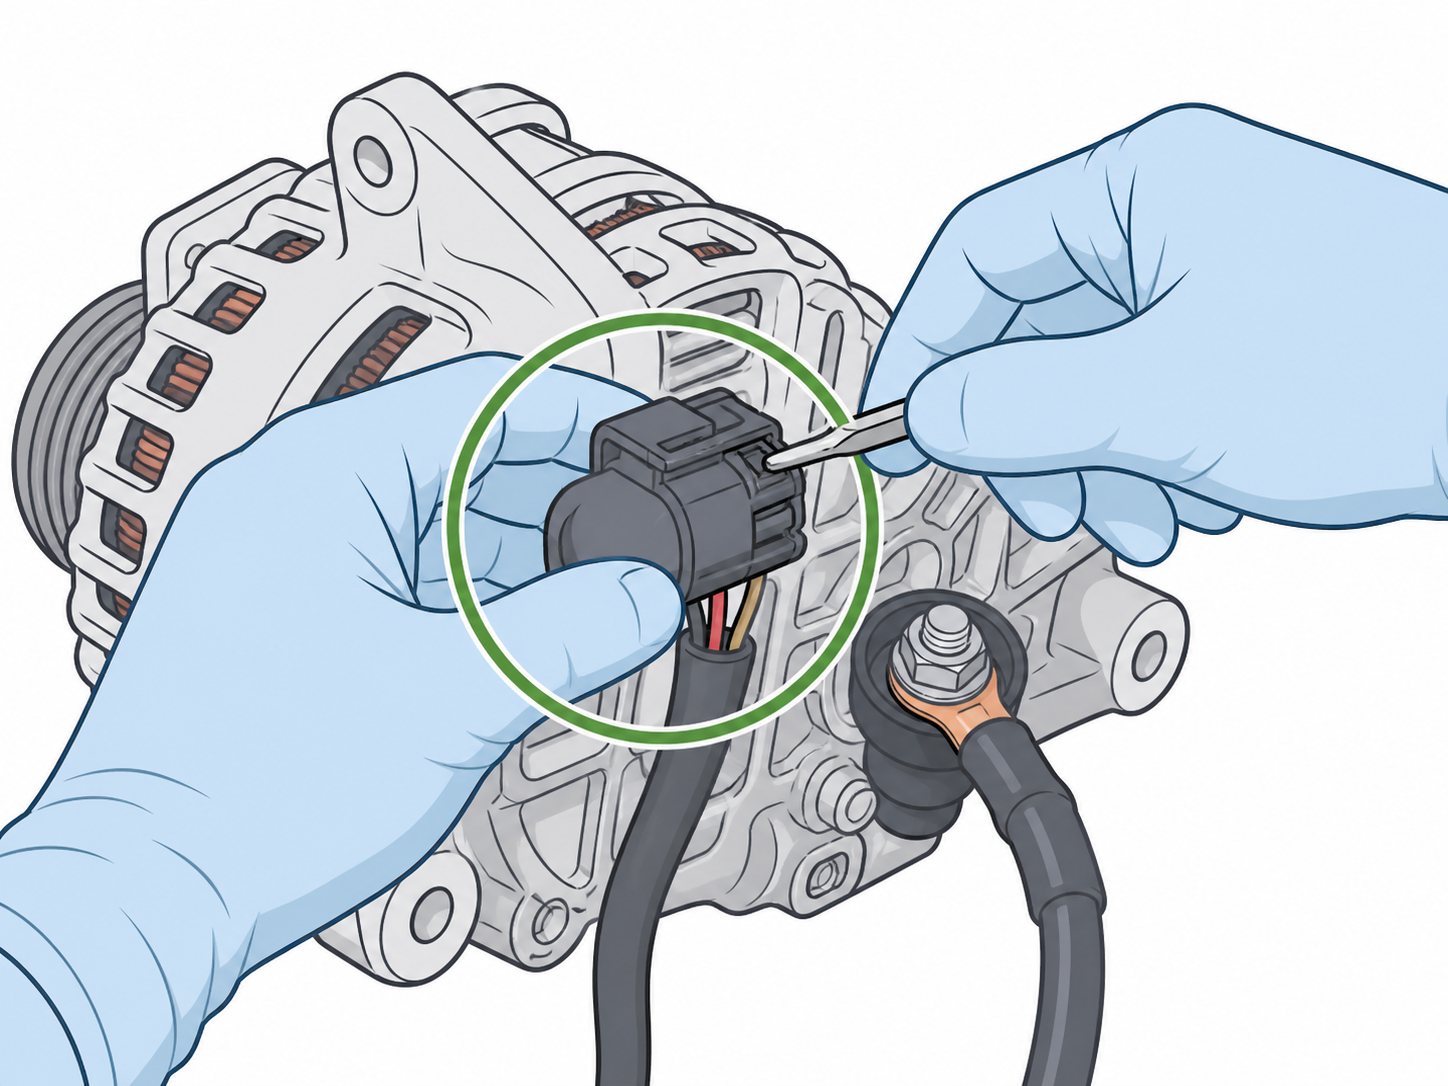
Step 5 - Disconnect the Alternator Wiring
Disconnect the main output cable and any control plug or sensor connector connected to the alternator. Some vehicles use a nut on a threaded output terminal. Others may use locking connectors or protective covers.
Do not pull on the wire itself. Pull connectors from the connector body and remove terminal nuts with the correct tool. Keep terminal hardware organized.
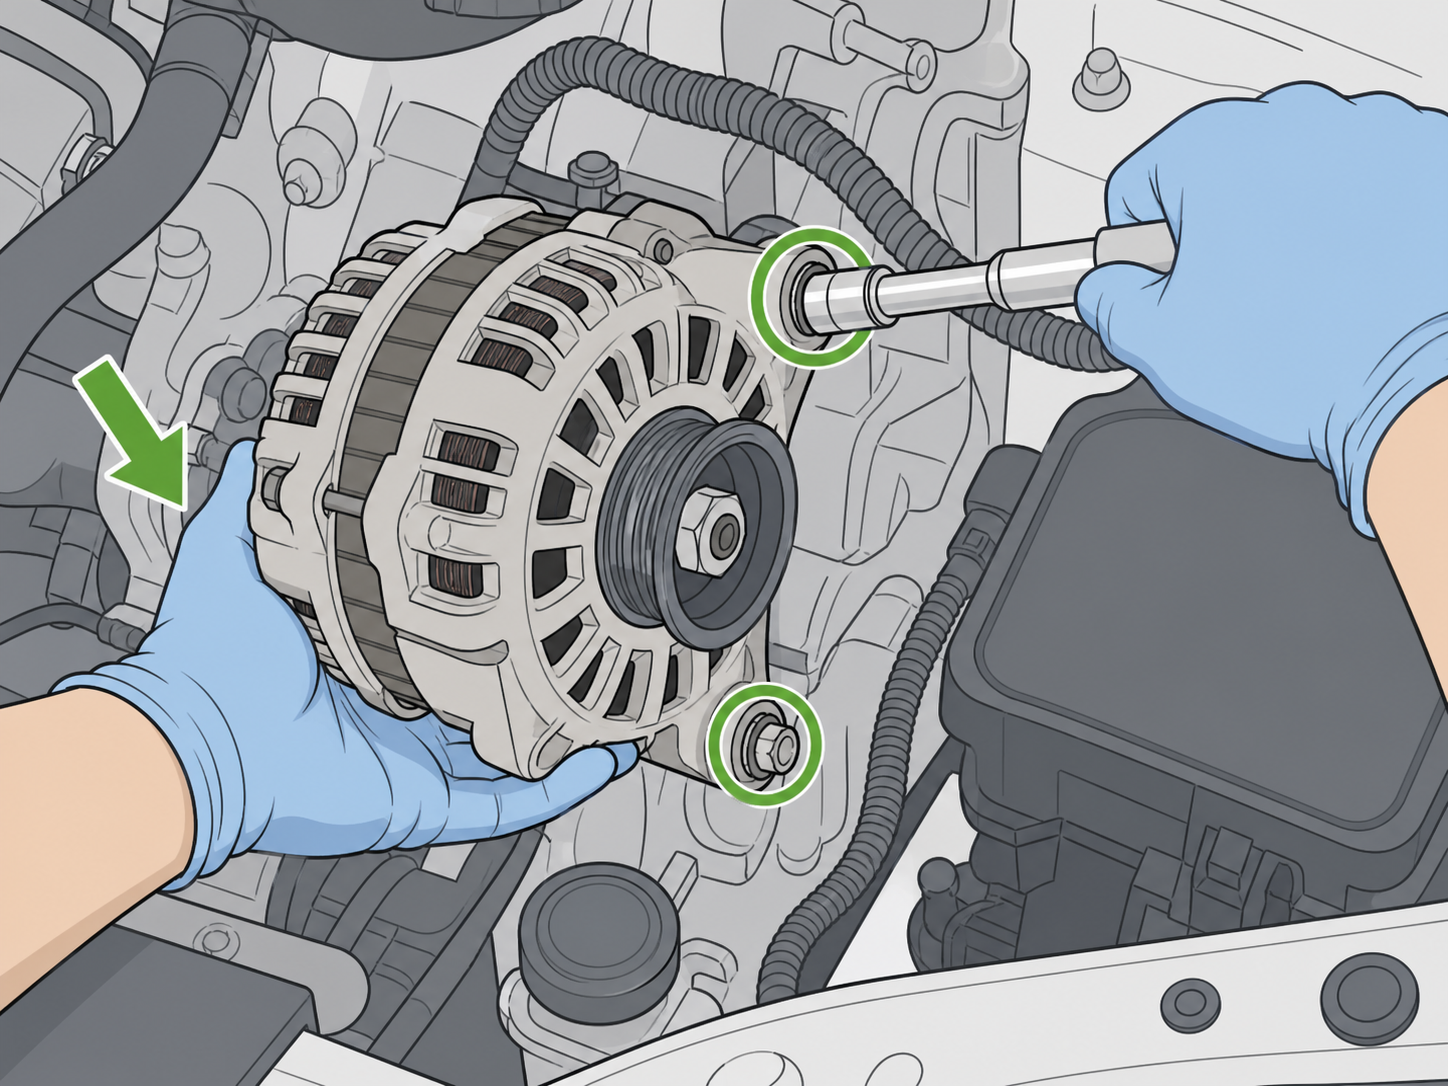
Step 6 - Remove the Retaining Bolts
Support the alternator before removing the last retaining bolt. Alternators can be heavy and may shift once the bolts are removed.
Remove the retaining bolts and carefully lift or lower the old alternator from the vehicle. If access is tight, follow the vehicle service manual for the correct removal path.
Do not pry, hammer, or force the alternator unless the vehicle service manual gives a specific procedure.
5. Installing the New Alternator
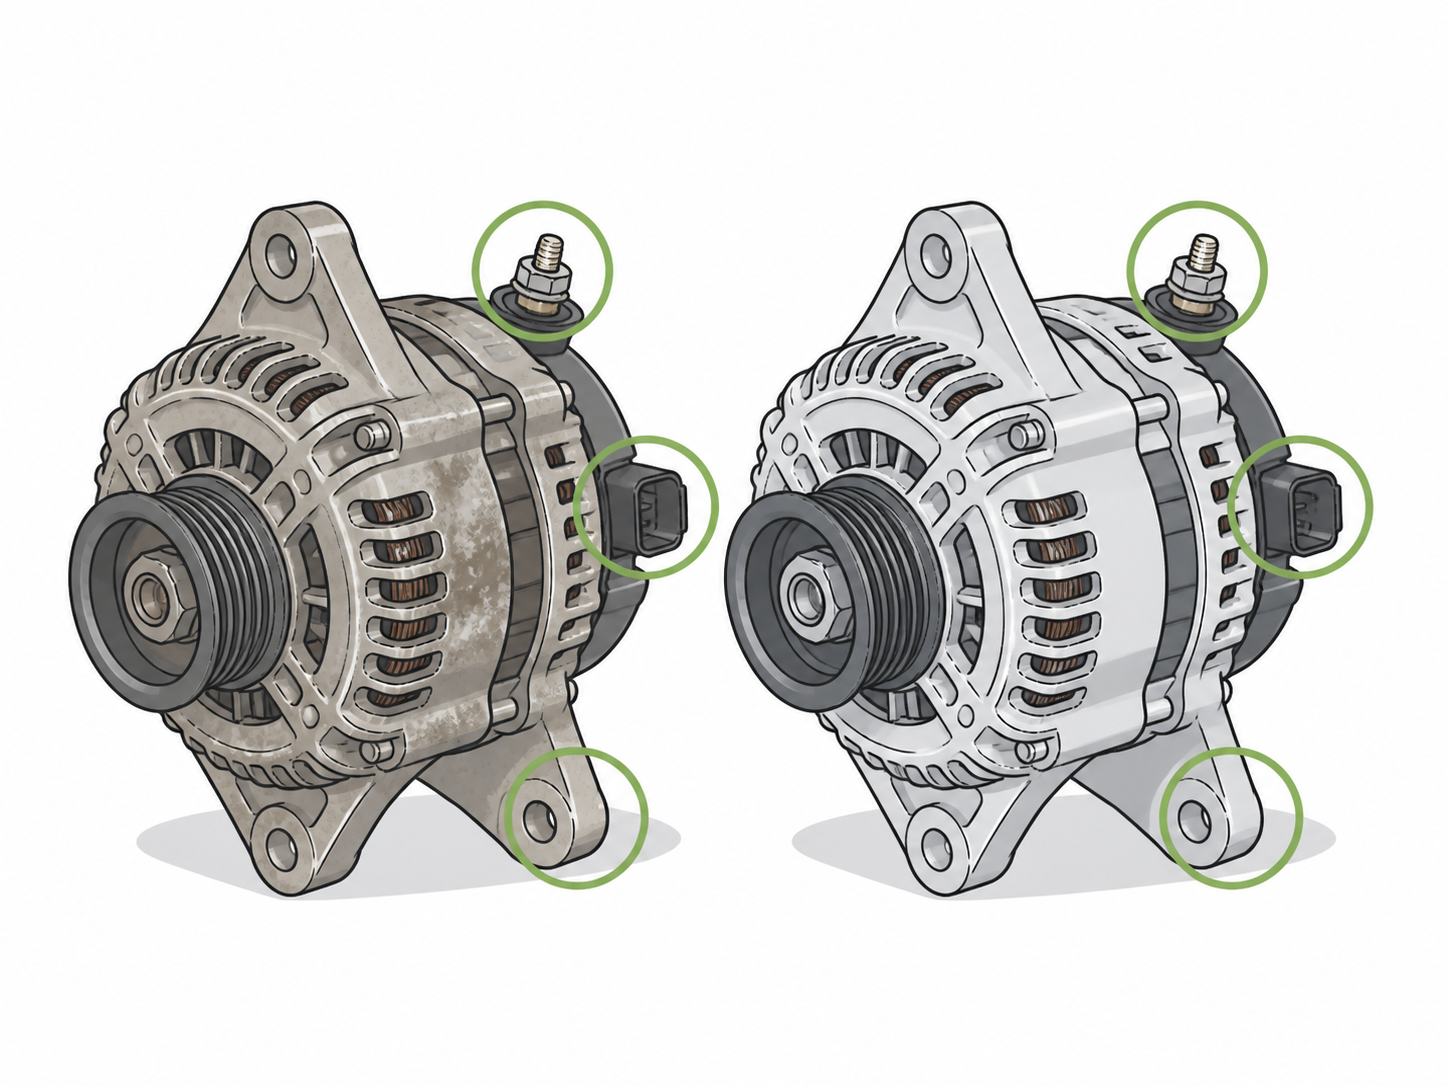
Install the new alternator only after the old alternator has been removed and the two parts can be compared side by side.
Step 1 - Compare the Old and New Alternator
Place the old alternator and new alternator side by side. Check the following:
- Overall shape and mounting orientation
- Mounting holes and mounting ear positions
- Pulley position and pulley type
- Connector position and connector style
- Main output terminal position
- Rear cover shape and clearance area
- Rotation/installation orientation if marked by the vehicle application
Some replacement alternators may have small visual differences. Small differences do not always mean the part is incorrect. If the mounting points, pulley position, belt alignment, connector style, or required electrical connections do not match, stop and verify fitment before installation.
Step 2 - Position the New Alternator
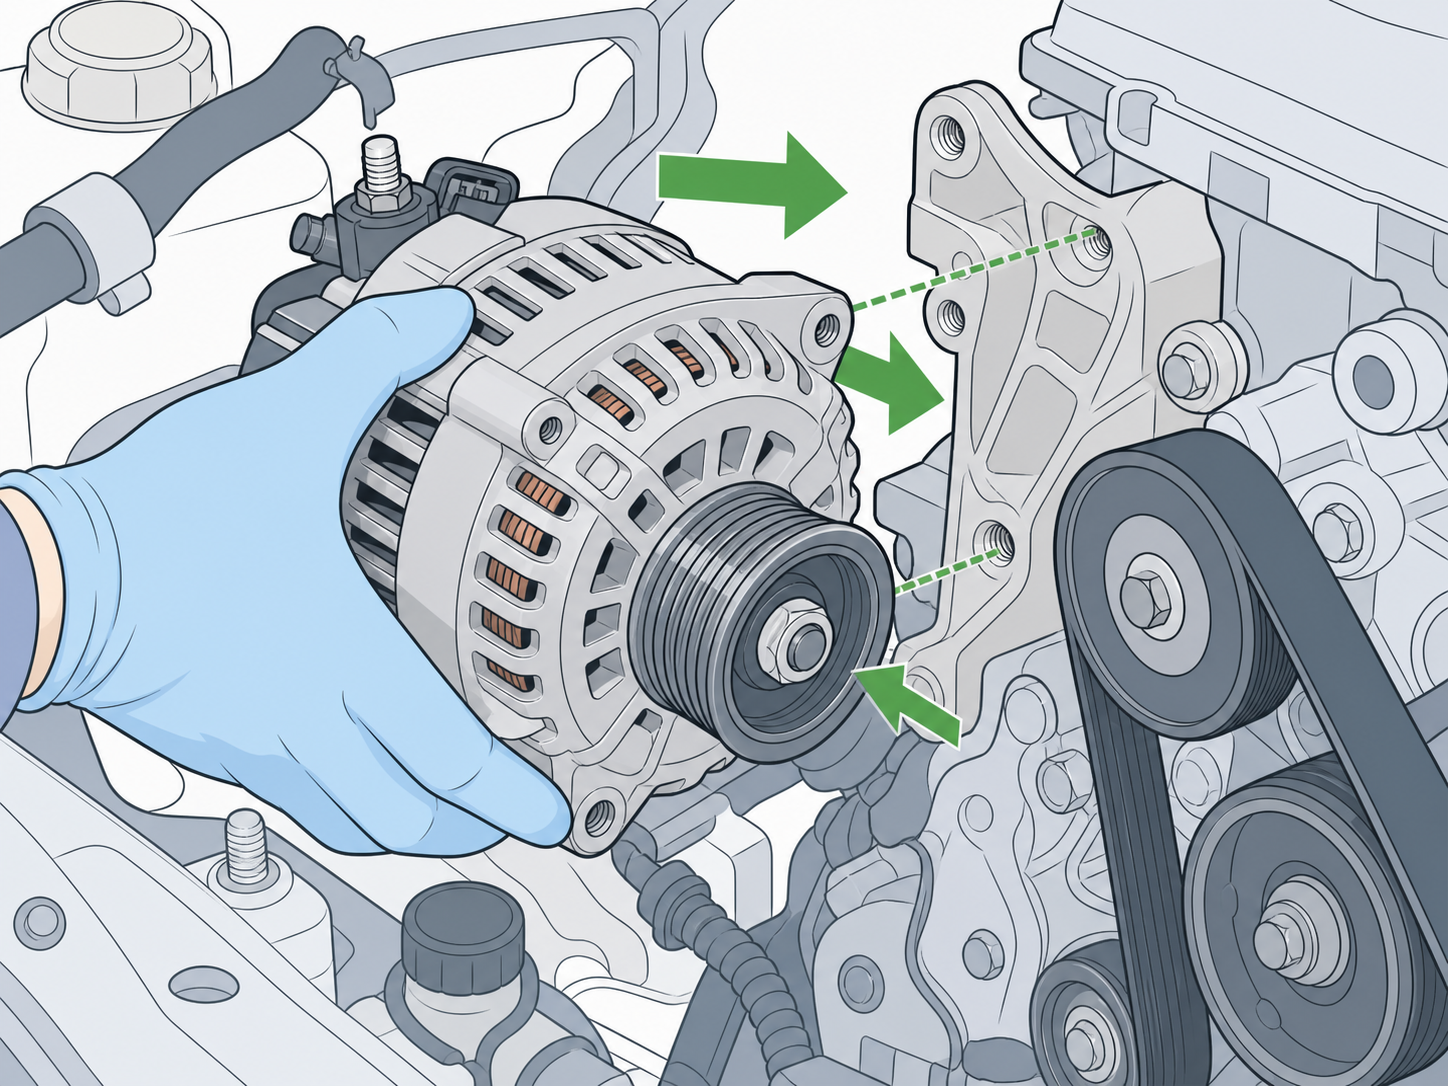
Place the new alternator into the original mounting position. Make sure the alternator sits flat against the mounting bracket and is not angled or forced into position.
Check that the pulley aligns with the belt path and nearby pulleys before tightening fasteners.
Step 3 - Start the Retaining Bolts for the First Few Turns
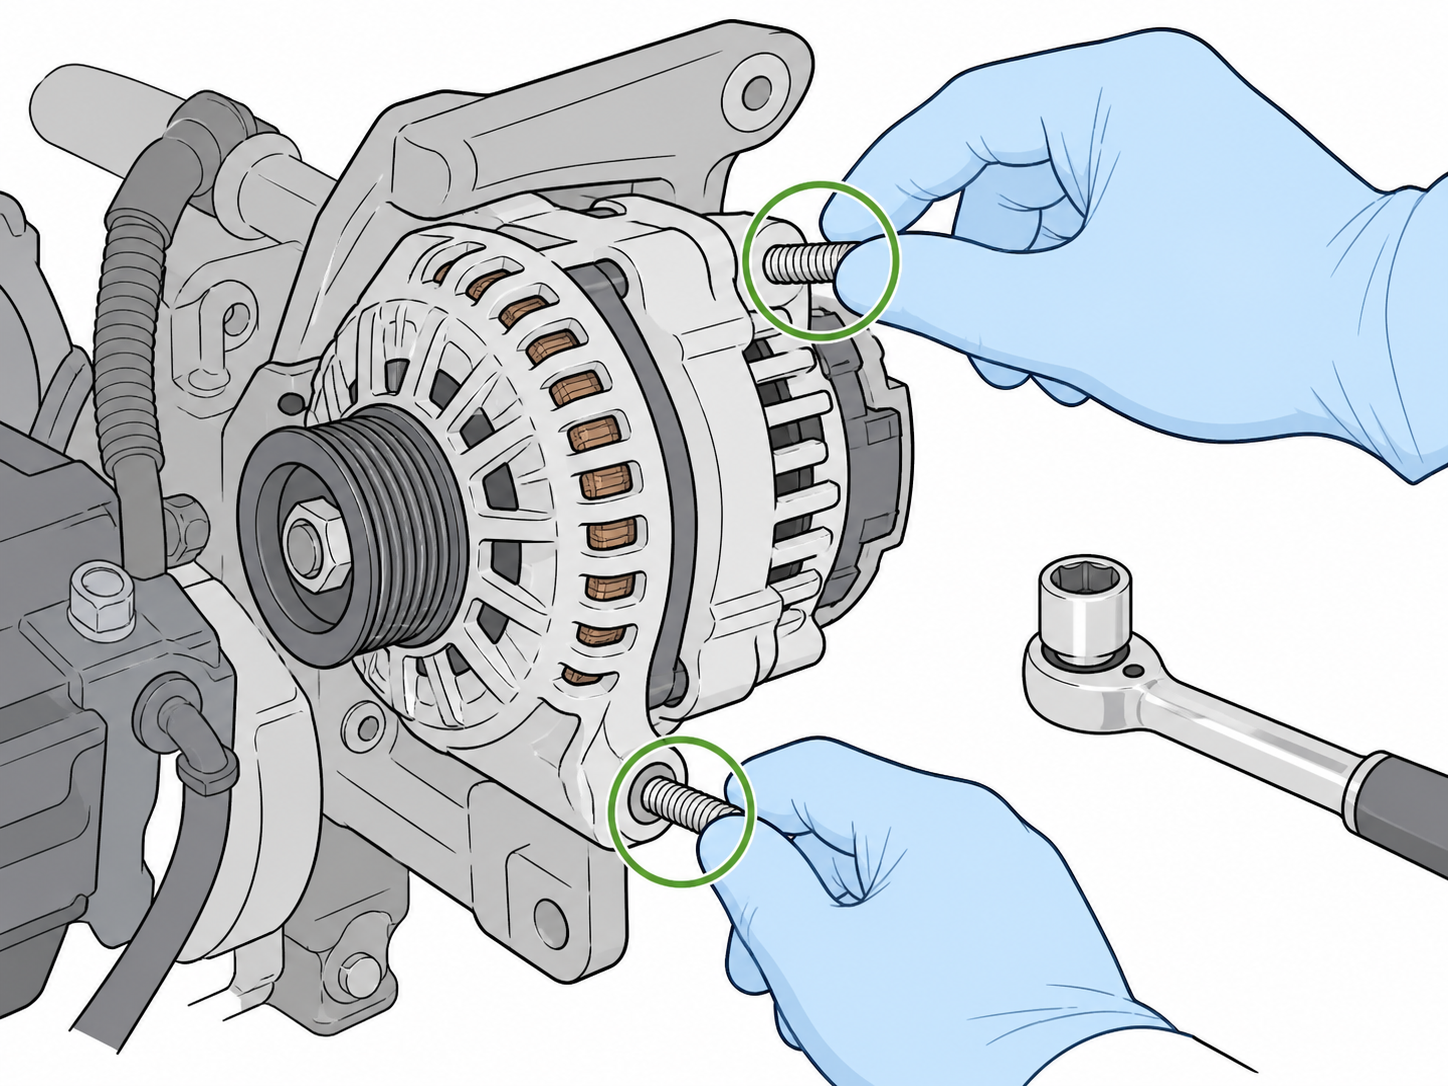
Use your fingers to thread each retaining bolt into the mounting holes for the first few turns before using a wrench or socket. This confirms the bolt is aligned correctly and reduces the risk of cross-threading. Once the bolts are properly started, tighten them securely according to the vehicle service manual.
Do not run the engine while the alternator is loose, misaligned, or not fully mounted.
Step 4 - Reconnect the Wiring
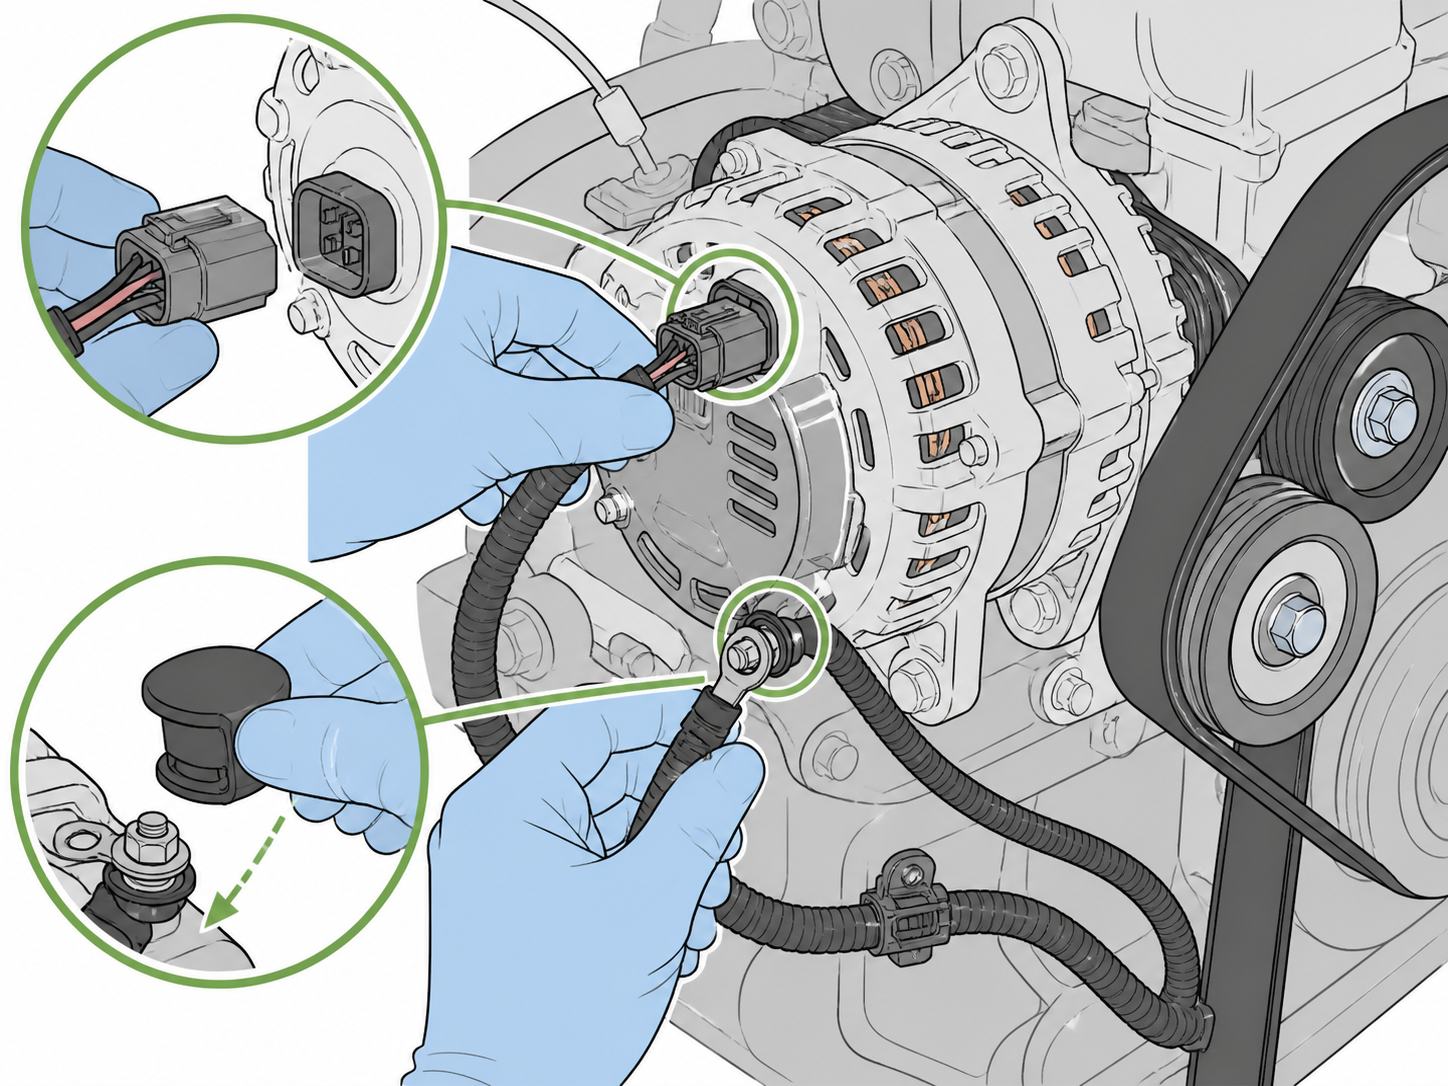
Reconnect the wiring according to the photo you took before removal and the vehicle service manual. Make sure each wire or connector is connected to the correct terminal and tightened securely.
Keep wiring away from moving belts and pulleys, sharp edges, and hot components. Make sure any protective terminal cover is returned to its proper position.
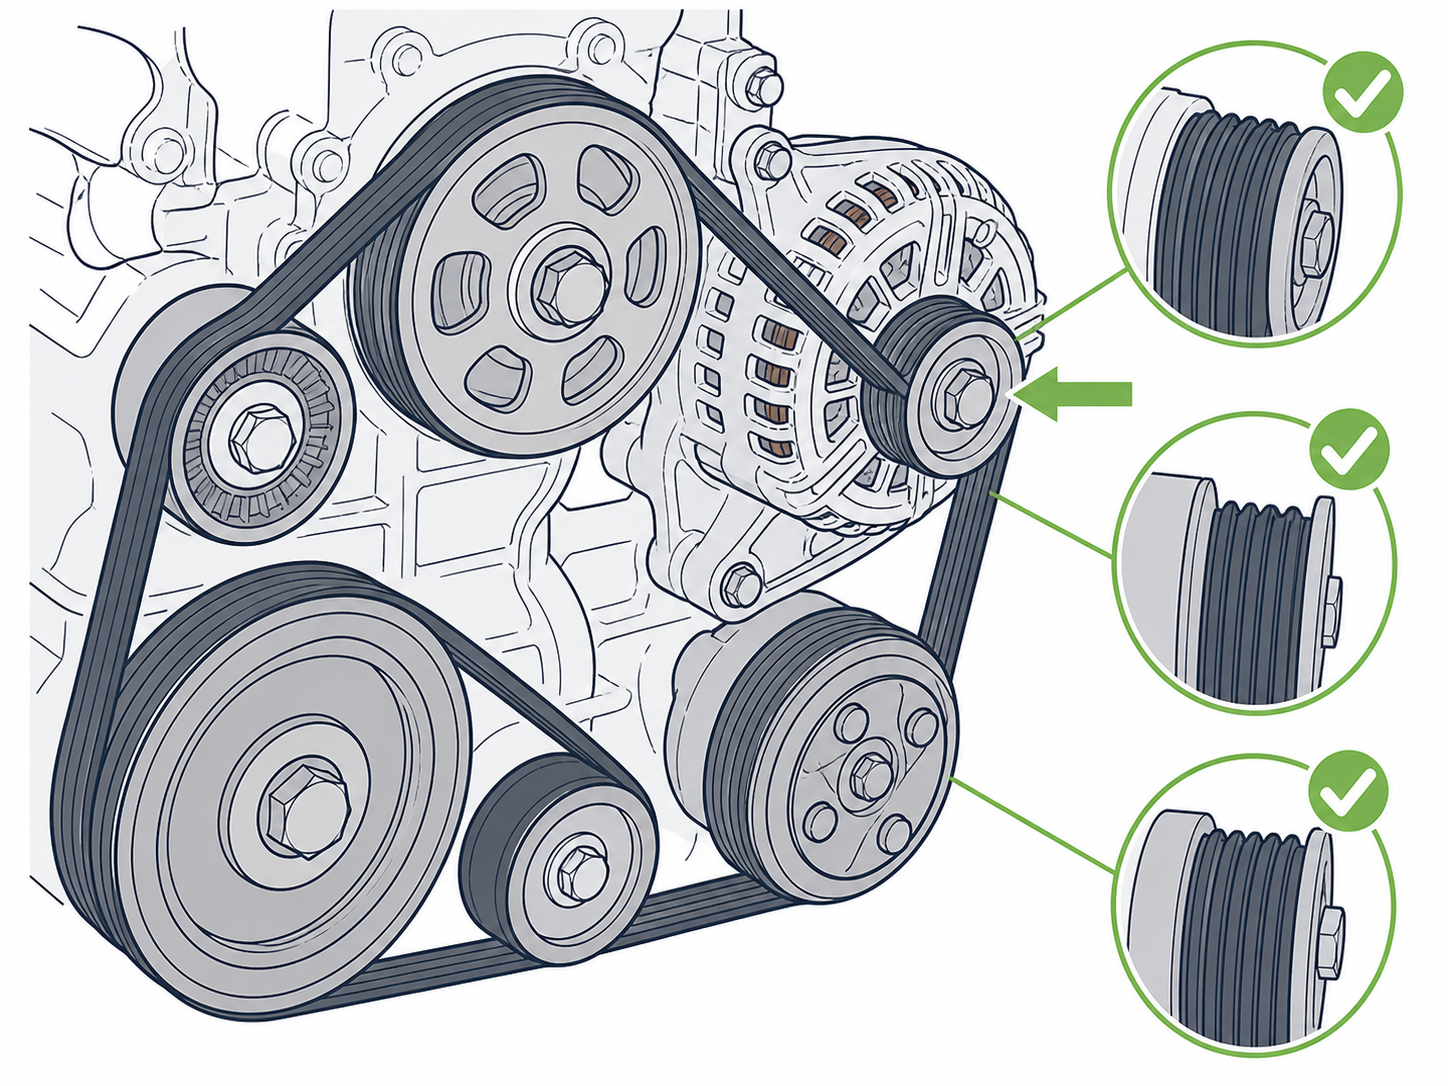
Step 5 - Reinstall the Belt and Check Alignment
Reinstall the belt using the vehicle service manual and belt routing label if present. Belt routing and tensioning methods vary by vehicle.
With an automatic tensioner, use the correct tool, route the belt over the alternator pulley, and release the tensioner slowly.
With an adjustable alternator bracket, seat the belt, set tension according to the service manual, and tighten the adjustment and mounting bolts. Use only approved pry points; never pry against the alternator housing, pulley, plastic cover, wiring connector, or delicate mounting areas.
Confirm the belt sits fully in each pulley groove and is not twisted, partly seated, or riding on an edge. After tension is restored, check pulley alignment and belt seating before starting the engine.
Step 6 - Reconnect the Battery and Test the Vehicle
Before reconnecting the battery, confirm that all removed brackets, protective covers, terminal covers, tools, and loose hardware are clear of the belt area and engine bay.
Reconnect the negative battery cable after the alternator is mounted, wired, and the belt is correctly installed. Make sure the battery cable is secure.
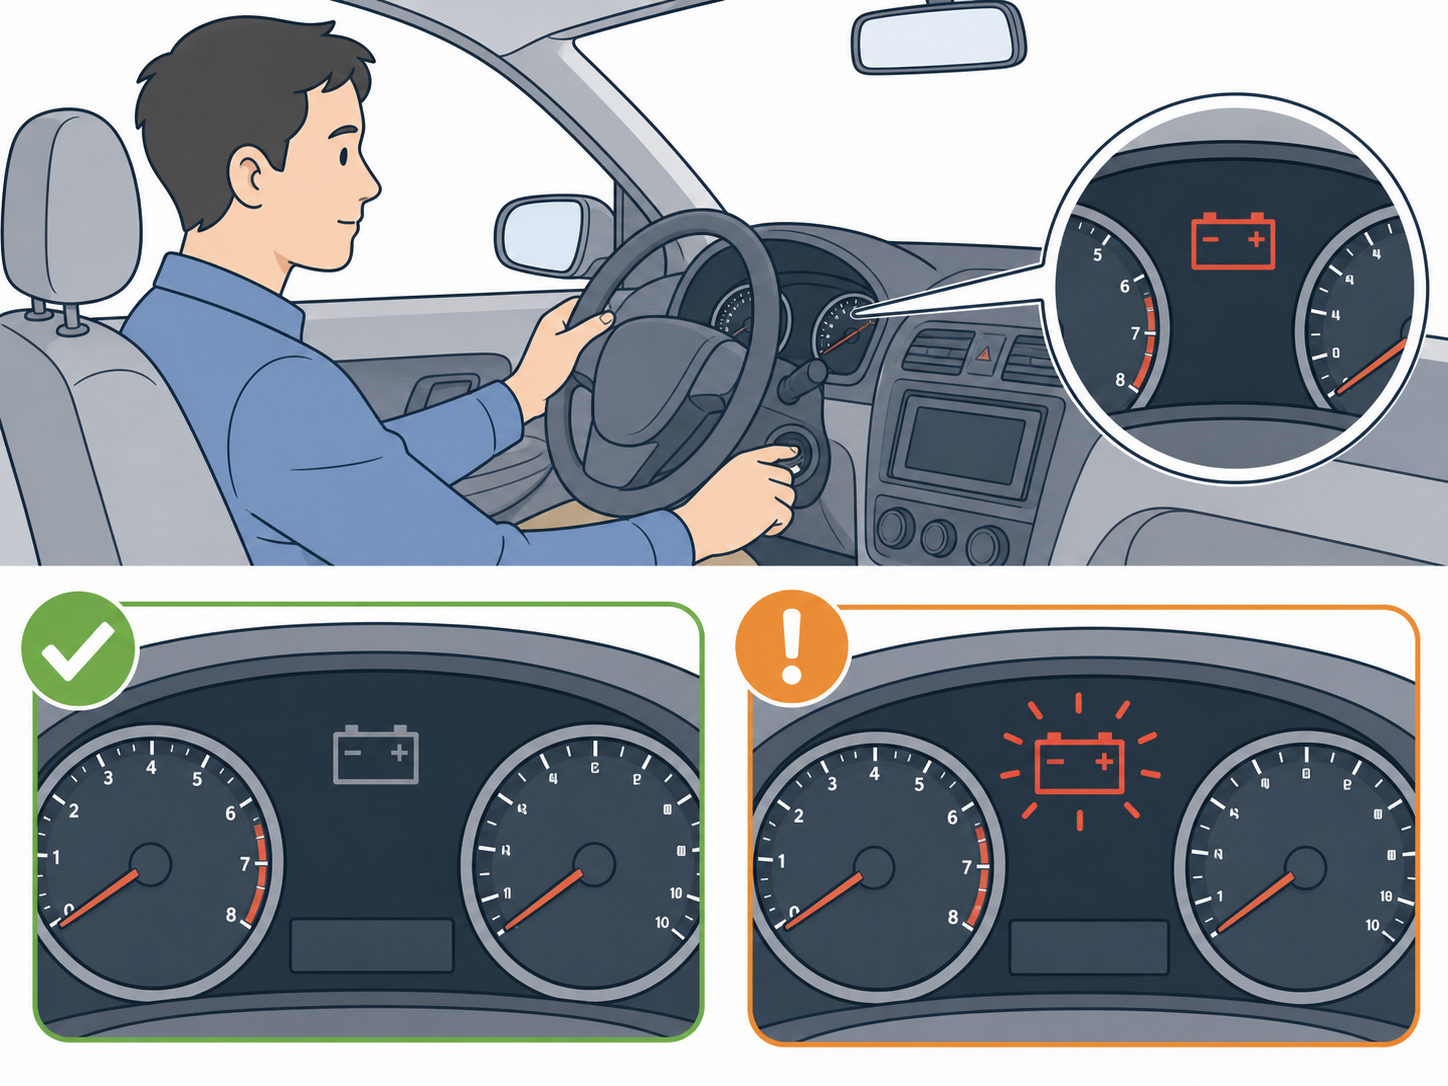
Start the vehicle briefly and observe for abnormal noise, belt movement, burning smell, smoke, or warning lights. Stop the engine and inspect if you hear squealing, grinding, rubbing, or see the belt moving incorrectly.
If the battery or charging warning light remains on, do not assume the alternator is defective. Check the battery, belt, wiring, fuses, grounds, and vehicle service information.
6. Troubleshooting
This section provides basic troubleshooting only. It does not replace professional diagnosis.
Quick Troubleshooting Table
| Symptom | Possible Causes | What To Check First |
|---|---|---|
| Battery warning light remains on | Weak battery, loose connector, open fuse or fusible link, belt issue, charging circuit issue, vehicle control issue | Battery condition, belt seating, alternator connector, output cable, fuse/fusible link, ground cable |
| Battery not charging after replacement | Poor cable connection, incorrect fitment, belt slipping, fuse/fusible link issue, control circuit issue | Wiring tightness, belt tension/seating, part comparison, charging circuit information |
| Squealing noise after installation | Belt not seated, belt tension issue, pulley misalignment, worn belt, tensioner issue | Belt routing, pulley grooves, belt condition, tensioner movement |
| Rubbing, grinding, or abnormal pulley noise | Alternator misalignment, loose fasteners, damaged pulley, nearby contact | Mounting surface, retaining bolts, pulley clearance, belt path |
| Burning smell or smoke | Short circuit, wiring contact with hot/moving parts, belt slip, incorrect connection | Stop engine, disconnect battery if safe, inspect wiring, belt, terminal cover, and connectors |
| Electrical accessories weak or flickering | Weak battery, poor ground, loose charging cable, charging control issue | Battery, terminals, grounds, alternator output cable, vehicle diagnostic information |
| Vehicle still has charging problem after replacement | Alternator may not be the root cause; battery, belt, wiring, fuse, ground, sensor, or control circuit may be involved | Battery, belt drive, fuses, wiring, grounds, vehicle diagnostic information |
Important Troubleshooting Notes
- Do not assume the alternator is defective before checking the battery, belt, wiring, fuses, and grounds.
- Do not repeatedly run the engine if the belt is misaligned, smoking, squealing heavily, or rubbing.
- Do not bypass charging circuits or short terminals for testing.
- If the symptom continues, stop and seek professional diagnosis or contact support with clear photos and symptom details.
7. Use and Maintenance
Proper use and maintenance help protect the alternator and charging system.
Use Guidelines
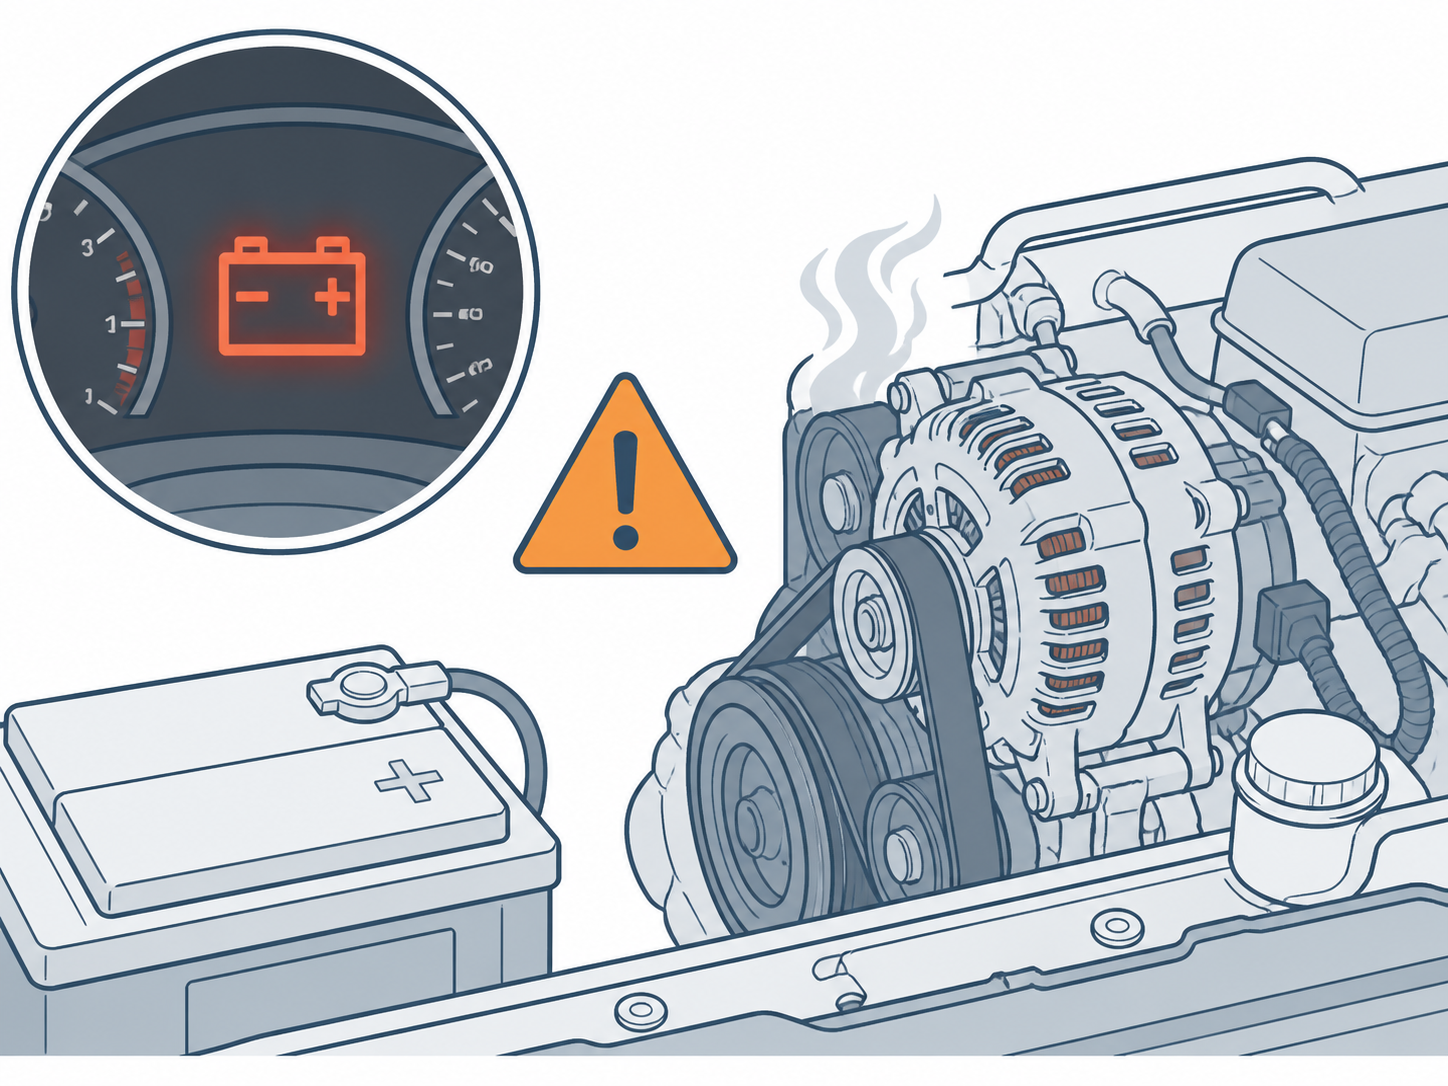
- Stop using the vehicle if you notice smoke, burning smell, severe belt noise, abnormal pulley noise, or repeated warning lights.
- Do not ignore a battery or charging warning light after installation.
- Do not operate the vehicle if the belt is visibly misaligned, damaged, or coming off the pulley.
- If charging-system symptoms continue after several basic checks, stop and seek professional diagnosis.
Basic Maintenance
- Keep battery terminals clean and tight.
- Check battery cables and ground connections periodically.
- Inspect the belt for cracks, glazing, fraying, contamination, or abnormal wear during routine service.
- Keep alternator wiring secure and away from heat, sharp edges, and moving parts.
- Inspect for corrosion, loose wiring, damaged terminal covers, or visible damage during routine vehicle service.
Internal alternator repair, regulator replacement, diode testing, brush service, bearing service, or pulley replacement should be handled by qualified personnel and is not covered in this handbook.
8. Storage and Handling
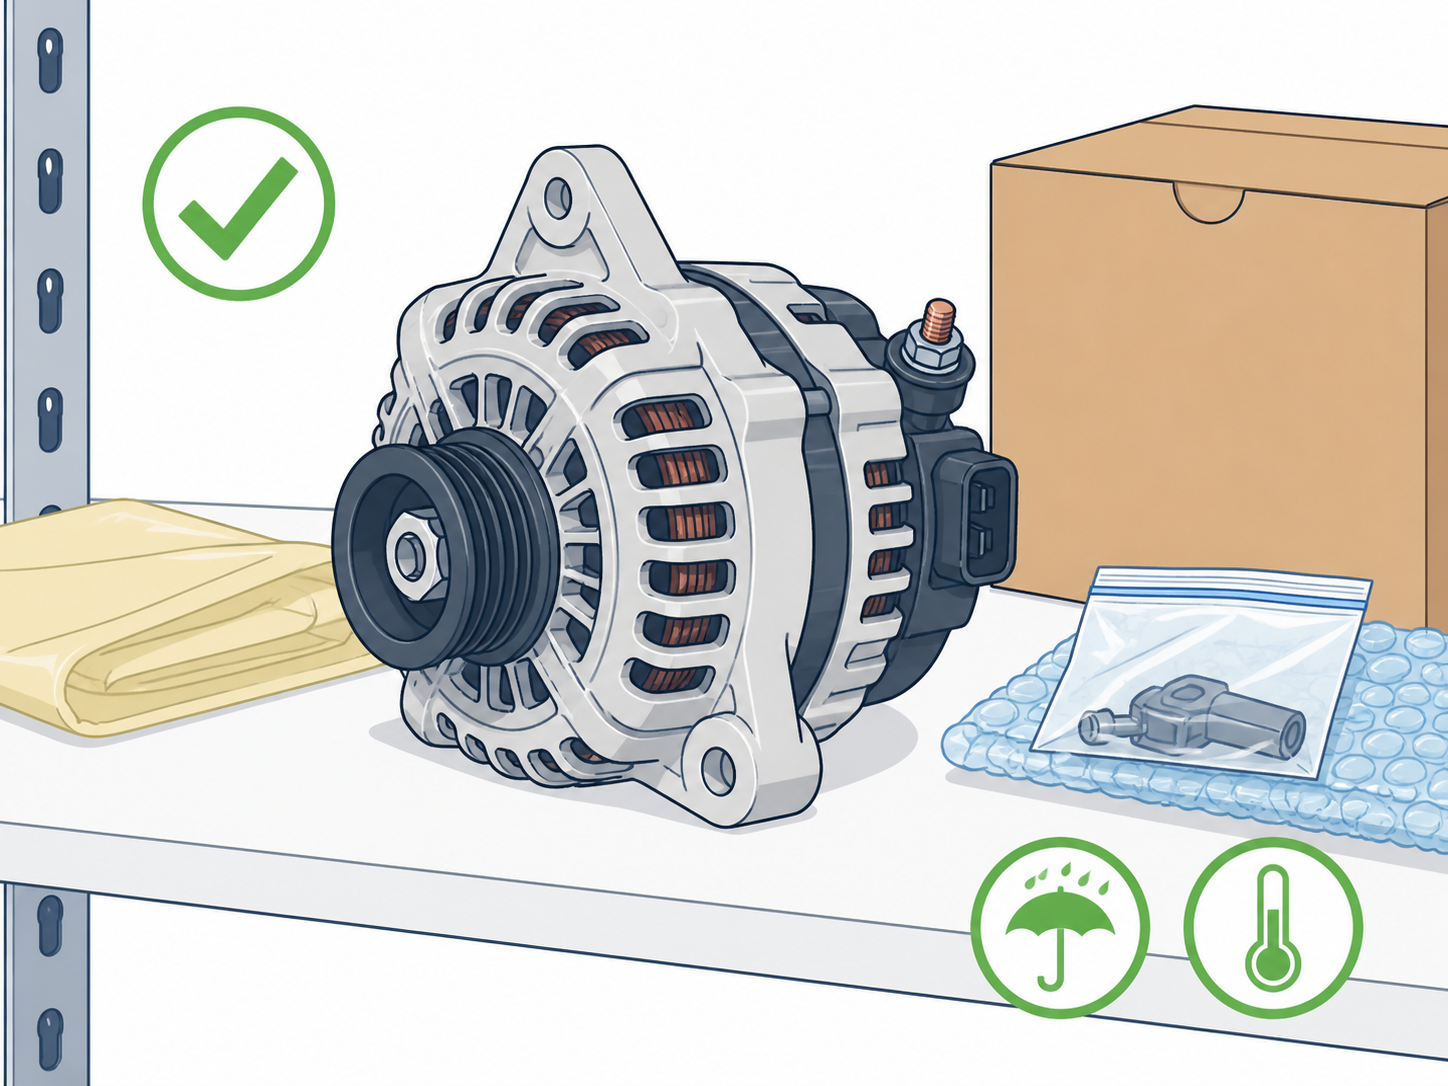
If the alternator is stored before installation, handle it carefully.
Storage Guidelines
- Keep the alternator dry and clean.
- Store it away from corrosive liquids, acids, alkalis, and chemical vapors.
- Avoid dropping or striking the alternator.
- Do not place heavy objects on the pulley, connector, terminals, rear cover, housing, or mounting ears.
- Protect the pulley and connector area from impact.
- Keep the product packaging until installation is complete.
Before installation, inspect the alternator again for visible damage.
9. Customer Support Notice
If you need help before or after installation, prepare clear information before contacting support.
Information To Prepare
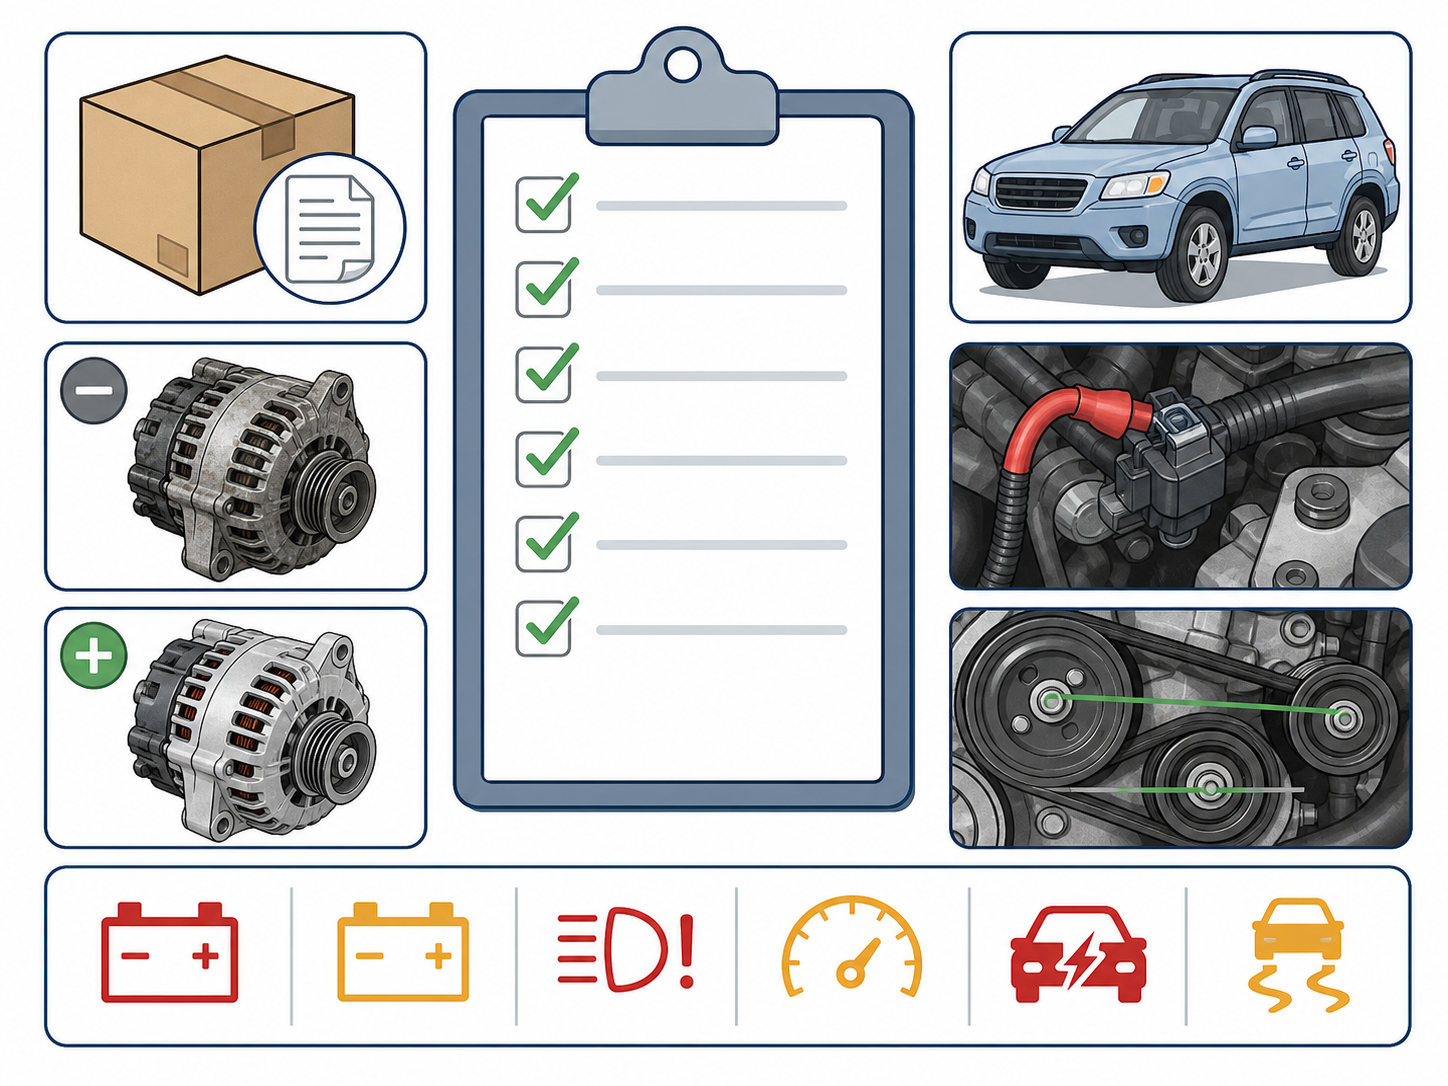
- Order information
- Vehicle year, make, model, and engine
- Photos of the old alternator and new alternator side by side
- Photos of the wiring before and after installation
- Photos of the belt routing and pulley alignment if accessible
- Photo of the installed alternator if accessible
- Description of the symptom
- Any sounds, smells, warning lights, or belt movement noticed after startup
- Battery and cable condition if known
When To Stop and Ask for Help
Stop installation or repeated test attempts if:
- The new and old alternator do not appear to match in key mounting, pulley, or connector positions
- Belt routing or tensioner operation is unclear
- Wiring terminal positions are unclear
- The belt squeals severely, rubs, smokes, or does not sit correctly on the pulleys
- The battery or charging warning light remains on after battery, belt, fuse, wiring, and ground checks
- You see smoke, smell burning, or notice damaged wiring